

Learn hatching and cross-hatching techniques for beginners, including line direction, spacing, pressure, shading, easy exercises, and common mistakes.
Hatching and Cross-Hatching for Beginners
Hatching and cross-hatching are simple drawing techniques that use lines to create light, dark areas, texture, and form.
Instead of shading an area with a solid layer of graphite, you can use carefully placed lines to build different values.
These techniques are useful for pencil drawing, sketching, illustration, and shading. They are also excellent exercises for improving line control and understanding light and dark values.
Pencil Shading for Beginners: A Step-by-Step Guide
Shading Techniques for Beginners: A Complete Step-by-Step Guide
The good news is that beginners do not need advanced drawing skills to start.
With a pencil, paper, and a little practice, you can learn the basic techniques step by step.
What Is Hatching in Drawing?
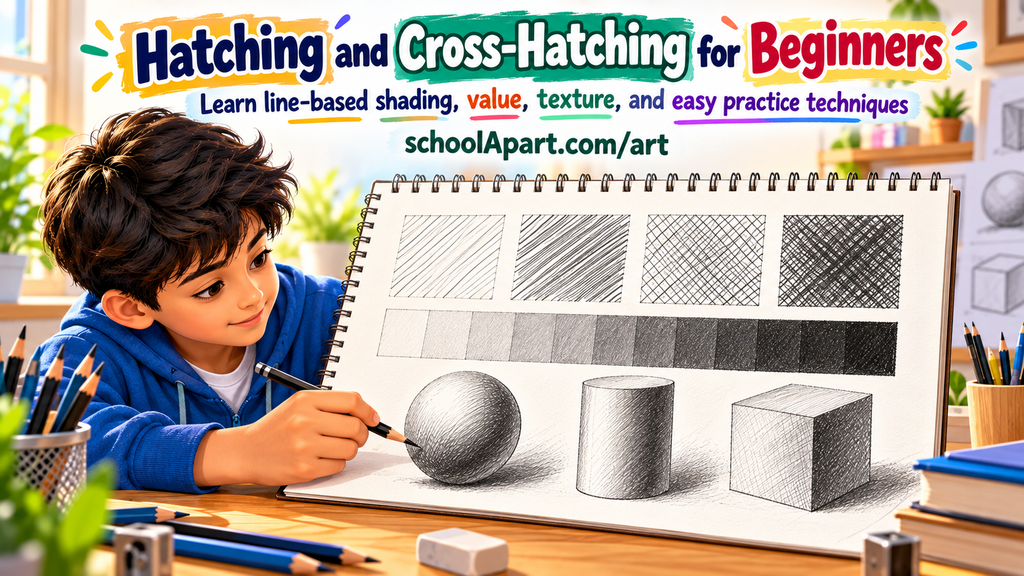
Hatching is a shading technique that uses a series of parallel lines to create tone, texture, or value.
The lines can be:
- Short or long
- Close together or far apart
- Light or dark
- Straight or slightly curved
For example:
Light hatching: fewer, lighter lines
Dark hatching: more, closely spaced lines
The basic idea is simple:
More lines + closer spacing = darker appearance
Fewer lines + wider spacing = lighter appearance
What Is Cross-Hatching?
Cross-hatching is a technique that uses overlapping sets of lines running in different directions.
You can begin with one layer of hatching and then place another layer across it.
For example:
First layer: //////
Second layer: \\\
The crossing lines create a denser pattern and can produce darker values.
Cross-hatching is particularly useful when you want to build stronger shadows or create textured surfaces.
Hatching vs Cross-Hatching
The main difference is the direction of the lines.
| Technique | Basic Idea | Common Use |
|---|---|---|
| Hatching | Parallel lines | Light shading, texture |
| Cross-hatching | Crossing line layers | Darker shading, texture |
| Dense hatching | Closely spaced lines | Dark values |
| Loose hatching | Widely spaced lines | Light values |
Neither technique is automatically better.
Choose the method based on the effect you want.
Why Learn Hatching and Cross-Hatching?
These techniques can help beginners develop several important drawing skills.
Better Line Control
You learn to control:
- Pencil movement
- Direction
- Pressure
- Spacing
Better Understanding of Value
You begin to understand how lines can create the appearance of light and dark.
Better Texture
Different line patterns can suggest different surfaces.
Better Form
Curved or directional hatching can help make a flat drawing appear more three-dimensional.
More Drawing Options
You do not always have to use smooth shading.
Hatching gives you another way to create tone and texture.
How to Practice Basic Hatching
Start with a simple rectangle.
Step 1: Draw a Rectangle
Make a small rectangle on your page.
Step 2: Add Parallel Lines
Draw lines in one direction.
Try to keep them approximately parallel.
Step 3: Change the Spacing
Create three sections:
- Widely spaced lines
- Medium spacing
- Closely spaced lines
Compare the visual darkness.
Step 4: Experiment With Pressure
Repeat the exercise using:
- Light pressure
- Medium pressure
- Stronger pressure
You will see how both spacing and pressure affect the result.
How to Practice Cross-Hatching
Start with another small rectangle.
Step 1
Draw one set of parallel lines.
Step 2
Add a second set of lines crossing the first.
Step 3
Change the angle.
Try:
- Horizontal + vertical
- Diagonal + opposite diagonal
- Slightly curved directions
Step 4
Increase the number of layers.
Notice how the area becomes visually darker.
The goal is not to create a perfect pattern.
The goal is to understand how overlapping lines affect value.
Line Spacing Matters
One of the easiest ways to control hatching is by changing the distance between lines.
Wide Spacing
Creates a lighter appearance.
Medium Spacing
Creates a medium value.
Close Spacing
Creates a darker appearance.
Try creating a gradual sequence:
Wide → Medium → Close
This is one of the best beginner exercises for understanding hatching.
Line Pressure Matters Too
Spacing is not the only way to control value.
Pencil pressure also matters.
Light Pressure
Produces lighter, softer lines.
Medium Pressure
Produces stronger lines.
Heavy Pressure
Produces darker lines.
For beginners, it is often useful to combine:
Light pressure + multiple layers
instead of pressing extremely hard immediately.
This gives you more control.
Hatching Direction
The direction of your lines can change the appearance of a drawing.
For example:
- Horizontal lines can suggest a flat surface.
- Vertical lines can suggest height.
- Diagonal lines can create movement.
- Curved lines can follow a rounded form.
The best direction depends on the subject.
Try to make your lines support the shape rather than placing them randomly.
Follow the Form
When drawing a three-dimensional object, your hatching can follow the object’s surface.
Imagine a round ball.
Instead of using completely straight lines, you can use gently curved lines that follow the surface.
This is called form-following hatching.
It can help communicate the roundness of the object.
For a cylinder, your lines can follow the curved surface.
For a rectangular box, straighter lines may work better.
Creating Light and Dark With Hatching
Hatching can be used to create a simple value scale.
Imagine a light source coming from the upper left.
The area closest to the light can have:
Fewer, lighter lines
The area farther from the light can have:
More, darker lines
This creates a gradual change in value.
You can practice:
Light → Medium → Dark
using only hatching.
This is a useful way to understand how shading works.
Creating a Value Scale With Hatching
Draw five small boxes.
Box 1
Almost empty or very lightly hatched.
Box 2
Light hatching.
Box 3
Medium hatching.
Box 4
Dense hatching.
Box 5
Very dense hatching or multiple layers.
Your goal is to create five visibly different values.
This simple exercise can improve your control considerably.
Using Cross-Hatching to Create Darker Values
Cross-hatching is particularly useful when one layer of hatching is not dark enough.
Start with:
Layer 1 → //////
Then add:
Layer 2 → \\\
You can then add another layer at a different angle if needed.
However, do not automatically add many layers.
Too many lines can make the drawing visually confusing.
Use only as many as necessary to communicate the value or texture.
Cross-Hatching Angles
You can experiment with different angles.
For example:
Two Directions
/////
\\\\\
Three Directions
Add a third layer at a different angle.
Four Directions
Multiple layers can produce very dense values.
For beginners, two directions are enough to start.
Focus on spacing and control before adding many layers.
Hatching for Texture
Hatching does not have to be perfectly regular.
Different line qualities can suggest different textures.
Wood
Try longer, irregular lines following the grain.
Grass
Use short upward strokes.
Fabric
Use softer, closely controlled lines.
Metal
Use carefully placed lines combined with strong light and dark areas.
Rough Surface
Use irregular lines and varied spacing.
The goal is not to copy a texture symbol.
Instead, observe the surface and choose marks that communicate its appearance.
Hatching With Different Pencil Grades
Different graphite pencils produce different results.
A harder pencil can produce lighter, cleaner lines.
A softer pencil can produce darker marks more easily.
You can practice hatching with different pencils and compare:
- Line darkness
- Smoothness
- Texture
- Ease of layering
You do not need a large pencil collection to learn hatching.
A simple graphite pencil is enough to begin.
For more information about pencil choices, see:
Hatching in Sketching
Hatching is particularly useful in sketching because it can add tone without requiring completely smooth shading.
For example, after creating the main outline of an object, you can use hatching to indicate:
- Shadow
- Form
- Texture
- Depth
This can make a simple sketch more visually interesting.
For more sketching practice, see:
How to Improve Your Sketching Skills: Practical Tips for Beginners
Hatching in Object Drawing
When drawing an object, first establish its structure.
Then add hatching.
A useful order is:
Shape → Proportion → Light Direction → Hatching → Details
Do not use hatching to hide an incorrect structure.
Make sure the basic drawing works first.
You can practice this with:
How to Draw Simple Objects Using Basic Shapes
Hatching and Shading
Hatching is one method of creating shading, but shading does not always have to use hatching.
You can create shading with:
- Smooth graphite
- Hatching
- Cross-hatching
- Layered strokes
- Blending
- Combination techniques
The best choice depends on the style of the artwork.
If you want to learn broader shading methods, see:
Shading Techniques for Beginners
Hatching and Light Direction
Before adding hatching, identify the light source.
For example:
Light source → upper left
Then:
- Upper-left areas may remain light.
- Lower-right areas may become darker.
- Cast shadows can receive denser hatching.
This gives your lines a purpose.
Without a clear light direction, hatching can become random.
Common Hatching Mistakes Beginners Make
Making Every Line Equally Dark
If every line has the same strength, it can be difficult to create a range of values.
Try: Vary pressure and spacing.
Making Lines Too Close Everywhere
Dense lines across the entire drawing can make it look too dark.
Try: Keep lighter areas more open.
Changing Direction Randomly
Random line directions can make a form look confusing.
Try: Let line direction support the object’s structure.
Pressing Too Hard
Heavy pressure can make corrections difficult.
Try: Start lightly and build gradually.
Using Too Many Cross-Hatching Layers
More layers do not always mean better shading.
Try: Stop when the required value is achieved.
Ignoring the Form
Straight lines placed randomly may not communicate a rounded or curved object.
Try: Follow the form where appropriate.
Focusing Only on the Pattern
Hatching is not about creating a beautiful line pattern by itself.
The lines should help communicate:
- Value
- Form
- Texture
- Light
Easy Hatching Exercises for Beginners
Exercise 1: Parallel Lines
Fill a page with parallel lines.
Practice keeping:
- Direction consistent
- Spacing controlled
- Pressure steady
Exercise 2: Spacing Practice
Create five boxes.
Use:
- Very wide spacing
- Wide spacing
- Medium spacing
- Close spacing
- Very close spacing
Compare the values.
Exercise 3: Pressure Practice
Create another five boxes.
Use:
- Very light pressure
- Light pressure
- Medium pressure
- Strong pressure
- Heavy pressure
Exercise 4: Cross-Hatching
Create a rectangle using one layer of hatching.
Then add:
Second layer → third layer → fourth layer
Observe how the value changes.
Exercise 5: Form Practice
Draw:
- Sphere
- Cylinder
- Cube
- Cone
Use hatching to suggest their three-dimensional forms.
Practice a Simple Sphere With Hatching
A sphere is useful for understanding how hatching can follow form.
Step 1
Draw a light circle.
Step 2
Identify the light source.
Step 3
Leave the lightest area mostly open.
Step 4
Add gentle curved hatching to the darker side.
Step 5
Increase the density gradually.
Step 6
Add a cast shadow underneath if appropriate.
The lines should follow the curved form rather than looking completely random.
Practice a Cylinder With Hatching
A cylinder is another useful exercise.
Step 1
Draw a simple cylinder.
Step 2
Identify the light direction.
Step 3
Use curved or slightly directional lines to follow the surface.
Step 4
Keep the light side lighter.
Step 5
Build darker hatching toward the shadow side.
This exercise teaches you how line direction can support form.
Hatching Practice With Everyday Objects
Once you are comfortable with basic exercises, choose simple objects such as:
- Cup
- Bottle
- Book
- Pencil
- Box
- Fruit
- Plant pot
First draw the object.
Then add hatching only where necessary.
This combines:
Observation + Proportion + Form + Value
For observational practice, you can also explore:
Object Sketching for Beginners
A Simple 15-Minute Hatching Practice Routine
You can practice for just 15 minutes.
3 Minutes — Line Warm-Up
Draw parallel lines using different pressures.
4 Minutes — Value Scale
Create a light-to-dark hatching scale.
4 Minutes — Cross-Hatching
Practice two and three layers.
4 Minutes — Object Practice
Apply the technique to a simple object.
Regular short sessions can help you develop better control than occasional long practice sessions.
When Should You Use Hatching?
Hatching can be useful when you want:
- Visible drawing texture
- A sketch-like appearance
- Controlled shading
- Line-based values
- Surface texture
- A graphic illustration style
It may not always be the best choice for every artwork.
For a very smooth realistic gradient, another shading method may work better.
When Should You Use Cross-Hatching?
Cross-hatching can be useful when you want:
- Darker values
- Stronger texture
- Graphic contrast
- Layered line work
- A traditional sketch or illustration effect
Again, use it because it supports the drawing—not simply because the technique is available.
How to Improve Your Hatching Skills
To improve, focus on one skill at a time.
First Practice
Line direction
Then:
Spacing
Then:
Pressure
Then:
Layering
Then:
Form-following
Finally:
Applying hatching to complete objects
This makes the learning process easier to manage.
Hatching and Cross-Hatching: Quick Comparison
| Feature | Hatching | Cross-Hatching |
|---|---|---|
| Lines | Parallel | Crossing |
| Difficulty | Beginner-friendly | Beginner to intermediate |
| Light values | Excellent | Possible |
| Dark values | Good | Very useful |
| Texture | Yes | Yes |
| Form | Yes | Yes |
| Practice | Simple | Requires more control |
Final Tips
Remember these rules when practicing:
- Start with light lines.
- Keep line direction controlled.
- Experiment with spacing.
- Practice different pencil pressures.
- Use more lines for darker values.
- Leave lighter areas more open.
- Follow the form when appropriate.
- Use cross-hatching gradually.
- Decide the light direction first.
- Avoid unnecessary layers.
- Practice on simple shapes before complex objects.
- Focus on value and form, not just the pattern.
Hatching and cross-hatching are simple but powerful techniques for creating value, texture, form, and depth with lines.
Hatching uses mostly parallel lines, while cross-hatching adds overlapping lines in different directions. By changing line spacing, pressure, direction, and the number of layers, you can create a wide range of light and dark values.
Start with simple exercises. Practice parallel lines, spacing, pressure, and cross-hatching before applying the techniques to spheres, cylinders, and everyday objects.
You do not need perfect lines.
The goal is to learn how your marks can communicate light, form, and texture.
With regular practice, hatching can become a useful part of your drawing and sketching toolkit.
Quick Takeaway
Hatching = parallel lines
Cross-Hatching = overlapping lines in different directions
Practice:
Line Control → Spacing → Pressure → Value → Form → Texture → Complete Drawing
Frequently Asked Questions (FAQ)
What is hatching in drawing?
Hatching is a drawing technique that uses parallel lines to create tone, shading, texture, and value.
What is cross-hatching?
Cross-hatching uses overlapping sets of lines in different directions to create darker values or textured effects.
What is the difference between hatching and cross-hatching?
Hatching mainly uses parallel lines, while cross-hatching adds another set of lines crossing the first set.
Is hatching good for beginners?
Yes. Hatching is a useful beginner technique because it helps develop line control, spacing, pressure, and understanding of light and dark values.
How do you practice hatching?
Start by drawing parallel lines and practice changing their spacing and pressure. Then use the technique to create light-to-dark value scales.
How do you practice cross-hatching?
Start with one layer of parallel lines and add a second layer crossing the first. Gradually experiment with spacing, pressure, and additional layers.
How do you make hatching darker?
You can make hatching darker by using closer line spacing, slightly stronger pressure, or additional layers.
How do you make hatching lighter?
Use lighter pressure and leave more space between the lines.
Can hatching be used for shading?
Yes. Hatching is a common way to create shading and value using lines instead of smooth graphite.
Can colored pencils be used for hatching?
Yes. Hatching and cross-hatching can be adapted to colored pencils to create texture and darker areas.
Does hatching work for realistic drawing?
Yes, although the result depends on the drawing style and how carefully the lines are controlled.
Should hatching lines follow the shape of an object?
They can. Following the form can help communicate curved or three-dimensional surfaces.
How many cross-hatching layers should beginners use?
Two layers are enough to begin. Additional layers can be added gradually when you need darker values.
What pencil is best for hatching?
A regular graphite pencil is enough for beginners. Different pencil grades can be tested later to explore different line qualities.
Is cross-hatching the same as shading?
Not exactly. Cross-hatching is one method of creating shading, while shading is a broader concept that includes several techniques.
Can hatching be used for texture?
Yes. Different line directions, lengths, spacing, and irregularities can suggest different surface textures.


Leave a Reply