

Learn pencil shading for beginners with simple exercises, shading techniques, light and shadow basics, and a step-by-step sphere drawing guide.
Pencil Shading for Beginners: A Step-by-Step Guide
Pencil shading is an important drawing skill that helps artists make flat shapes look three-dimensional. By changing the pressure of a pencil and gradually building light and dark tones, beginners can create depth, texture, and realistic-looking objects.
Hatching and Cross-Hatching for Beginners: Easy Drawing Techniques
Shading Techniques for Beginners: A Complete Step-by-Step Guide
You do not need expensive art supplies to begin. A regular pencil, an eraser, and a sheet of paper are enough to start practicing pencil shading.
In this guide, you will learn how pencil shading works, which tools to use, how to create different shades, and how to practice shading step by step.
What Is Pencil Shading?
Pencil shading is the technique of using a pencil to create different tones of light and dark in a drawing. These tones help show the shape, surface, and depth of an object.
For example, a circle looks flat when it has only an outline. When you add a highlight, midtones, a dark shadow, and a cast shadow, the circle can look like a three-dimensional sphere.
Pencil shading is useful for drawing fruits, balls, cups, leaves, faces, and many other objects.
Materials Needed for Pencil Shading
You can begin with a few simple drawing materials.
- Pencil: An HB pencil is suitable for basic shading practice. Softer pencils, such as 2B or 4B, can create darker tones.
- Paper: Use smooth drawing paper or a clean notebook page.
- Eraser: A regular eraser helps correct mistakes. A kneaded eraser can be useful for lifting graphite gently.
- Sharpener: Keep your pencil sharp when you need clean edges or fine details.
- Blending tool (optional): A blending stump can help smooth graphite, but beginners can learn a great deal without one.
Art Supplies for Beginners: Essential Drawing & Painting Materials You Need
You do not need every tool at once. Start with an HB pencil and paper, then experiment with other pencils as your control improves.
Understanding Light and Dark Tones
Before practicing pencil shading, understand how different tones work.
1. Highlight
The highlight is the brightest area of an object. It usually appears where light hits the surface directly.
2. Light Tone
A light tone is slightly darker than the highlight. Use gentle pencil pressure to create it.
3. Midtone
A midtone is between the light and dark areas. It helps connect different values smoothly.
4. Core Shadow
The core shadow is the darker area on the object that receives less direct light.
5. Cast Shadow
A cast shadow appears on the surface behind or beneath an object when the object blocks light.
These areas may look different depending on the object’s shape, surface, and light source.
How to Create Different Pencil Shades
The key to good pencil shading is controlling pressure rather than pressing as hard as possible.
Step 1: Start With Light Pressure
Hold your pencil comfortably and make a few light strokes. Avoid pressing hard because strong pressure can leave marks that are difficult to erase.
Step 2: Make a Light-to-Dark Gradient
Draw a long rectangle. Shade one end lightly and gradually increase the pencil pressure toward the other end.
Try to make the change from light to dark as smooth as possible.
Step 3: Practice Different Pressure Levels
Create five small boxes beside each other.
- Box 1: Very light shading
- Box 2: Light shading
- Box 3: Medium shading
- Box 4: Dark shading
- Box 5: Very dark shading
Keep the pressure consistent within each box. This exercise teaches you to control the range of tones.
Step 4: Layer the Graphite
Instead of trying to create a dark shade immediately, add several light layers. Build the darkness gradually until you reach the tone you want.
Step 5: Keep the Highlight Clean
Leave a small area of paper unshaded where the brightest light should appear. You can also lift a little graphite with an eraser if needed.
Three Basic Pencil Shading Techniques
Beginners can use several methods to apply graphite.
Shading Techniques for Beginners: A Complete Step-by-Step Guide
1. Smooth Shading
Use light, overlapping pencil strokes to create an even tone. Keep your pressure gentle and avoid sudden changes in darkness.
This technique is useful for shading rounded objects and creating gradual transitions.
2. Hatching
Hatching uses a series of parallel lines to create tone. Closely spaced lines usually produce darker areas, while widely spaced lines create lighter areas.
Hatching is useful when you want visible pencil marks or a sketch-like appearance.
3. Cross-Hatching
Cross-hatching involves drawing one group of lines over another group at a different angle. Adding more layers can make an area darker.
Practice smooth shading, hatching, and cross-hatching separately before combining them in a drawing.
How to Shade a Sphere Step by Step
A sphere is one of the best objects for learning pencil shading because it helps you understand how light behaves on a rounded surface.
Step 1: Draw a Circle
Draw a light circle with an HB pencil. Do not make the outline too dark.
Step 2: Choose a Light Source
Imagine that light is coming from the upper-left side. Keep this direction consistent throughout the exercise.
Step 3: Leave the Highlight
Leave a small area near the upper-left side of the circle mostly white.
Step 4: Add the Light Tone
Use gentle, circular pencil strokes around the highlight. Keep the graphite light.
Step 5: Build the Midtones
Gradually add more graphite as you move away from the highlight. Blend the light and medium areas with overlapping strokes.
Step 6: Add the Core Shadow
Shade the side facing away from the light more darkly. Keep the transition gradual rather than making a hard stripe across the sphere.
Step 7: Add the Cast Shadow
Draw a soft shadow on the surface beneath the sphere, extending away from the light source. The shadow is usually darkest close to the point where the sphere meets the surface.
Step 8: Review the Values
Check whether the highlight, midtones, core shadow, and cast shadow are easy to distinguish. Adjust the tones gradually.
Your sphere should now look more rounded than the original outline.
Common Pencil Shading Mistakes
Beginners often make a few mistakes while learning shading.
Pressing Too Hard
Heavy pressure can make graphite difficult to erase and can damage the paper surface. Build darker tones gradually instead.
Using Only One Shade
A drawing with only one tone may look flat. Practice using a range of light, medium, and dark values.
Making the Shadow Too Sharp
Some shadows have sharp edges, but many become softer as they move away from the object. Observe the light source and the surface before deciding how sharp the shadow should be.
Blending Everything Too Much
Over-blending can remove useful texture and make the drawing look muddy. Keep some pencil strokes visible when they help describe the surface.
Ignoring the Light Source
If the highlight, object shadow, and cast shadow suggest different light directions, the drawing may look confusing. Decide where the light comes from before shading.
Rushing the Process
Shading improves through observation and repeated practice. Work in light layers and compare your tones as you go.
Easy Pencil Shading Exercises for Beginners
Try these exercises in order.
- Shading scale: Create five boxes ranging from very light to very dark.
- Gradient practice: Shade a rectangle from light on one side to dark on the other.
- Sphere shading: Draw and shade a circle to make it look three-dimensional.
- Cube shading: Draw a cube and give each visible face a different tone based on the light source.
- Fruit shading: Choose an apple, orange, or another simple fruit and observe its highlights and shadows.
- Cup shading: Draw a simple cup and shade its curved surface.
- Daily observation: Look at an object near a window and notice where the light and shadow appear.
Practice one exercise at a time. Compare your work with the object you are observing rather than expecting every drawing to look perfect.
A Simple 7-Day Pencil Shading Practice Plan
| Day | Practice task |
|---|---|
| Day 1 | Create a five-step shading scale |
| Day 2 | Practice a light-to-dark gradient |
| Day 3 | Practice smooth shading |
| Day 4 | Practice hatching and cross-hatching |
| Day 5 | Shade a sphere |
| Day 6 | Shade a cube and a simple fruit |
| Day 7 | Draw and shade one object from observation |
You can repeat this plan until you feel more confident controlling pencil pressure and creating different tones.
Tips to Improve Your Pencil Shading
- Start with simple shapes before moving to complicated objects.
- Use light strokes and build darker tones gradually.
- Observe the direction of light before you begin.
- Keep highlights lighter than the surrounding tones.
- Practice shading scales regularly.
- Avoid smudging the paper with your hand; place a clean sheet under your drawing hand if needed.
- Compare your shading with real objects to understand how light changes across different surfaces.
- Be patient. Smooth, controlled shading develops with practice.
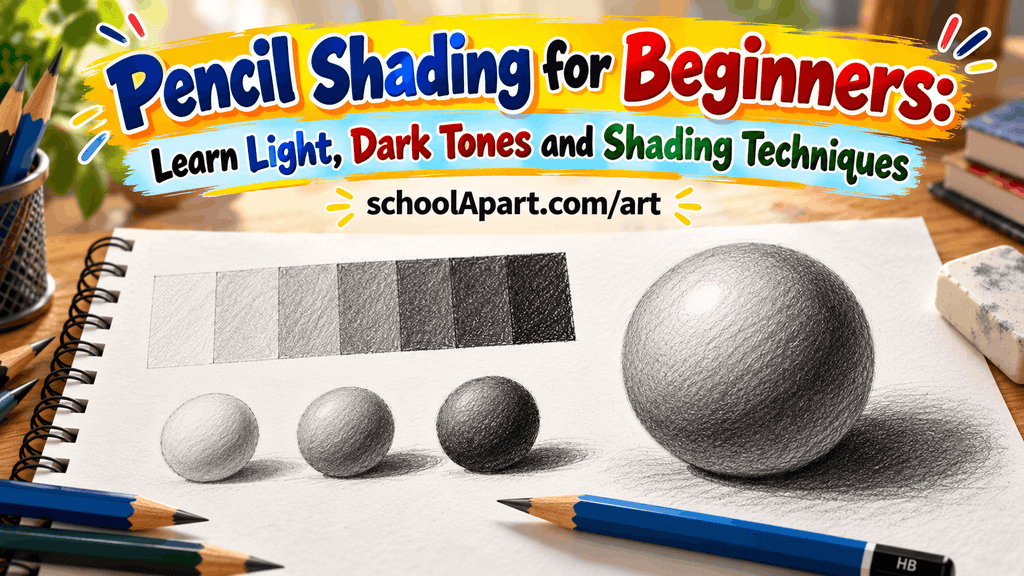
Pencil shading for beginners starts with learning to control pencil pressure, create a range of tones, and observe light and shadow. Simple exercises such as shading scales, gradients, spheres, and cubes can help you build these skills step by step.
Start with an HB pencil and a sheet of paper. Practice for a few minutes regularly, and gradually apply what you learn to everyday objects. With consistent practice, your drawings can develop better depth, form, and visual detail.
FAQ
1. What is pencil shading?
Pencil shading is a drawing technique that uses different levels of graphite darkness to show light, shadow, depth, and form.
2. How do beginners start pencil shading?
Start by practicing light and dark pencil strokes, creating a shading scale, and making a gradual light-to-dark gradient.
3. Which pencil is best for beginners for shading?
An HB pencil is a good starting point. A 2B pencil can help you create darker tones when you become more comfortable controlling pressure.
4. Can I learn pencil shading with a normal pencil?
Yes. A regular HB pencil, paper, and an eraser are enough to learn the basic principles of pencil shading.
5. How do I make pencil shading darker?
Build several light layers of graphite and gradually increase the pressure. Avoid pressing too hard at the beginning.
6. How can I make pencil shading smooth?
Use light, overlapping strokes and gradually change the pressure. Practice on a shading gradient before applying the technique to an object.
7. What is a shading scale?
A shading scale is a sequence of tones arranged from light to dark. It helps beginners practice and compare different levels of pencil pressure.
8. What is the difference between hatching and smooth shading?
Hatching uses visible lines to create tone, while smooth shading aims for a more continuous transition between light and dark areas.
9. How do I shade a sphere with a pencil?
Draw a circle, choose a light source, leave a highlight, build midtones, add the core shadow, and draw a cast shadow beneath the sphere.
10. Why does my pencil shading look flat?
It may look flat if you use only one tone, ignore the light source, or fail to create enough contrast between light and dark areas.
11. Should beginners blend pencil shading?
Blending is optional. Beginners should first learn to control pencil pressure and create tones. A blending stump or careful overlapping strokes can be introduced later.
12. How can I avoid smudging pencil shading?
Keep your drawing hand off heavily shaded areas, place a clean sheet under your hand, and avoid rubbing the paper unnecessarily.
13. Is an eraser useful for pencil shading?
Yes. An eraser can correct mistakes and lift graphite to create highlights or lighter areas.
14. How often should I practice pencil shading?
Short, regular practice sessions are useful. Even 10–15 minutes spent on shading scales and simple objects can help you develop control.
15. What should I shade first as a beginner?
Start with a shading scale, a gradient, a sphere, and a cube. These exercises teach the basic skills needed to shade more complicated objects.







Leave a Reply