

Learn the best shading techniques for beginners with this complete step-by-step guide. Discover pencil shading methods, value scales, light and shadow, pencil pressure, and practical exercises to create realistic drawings.
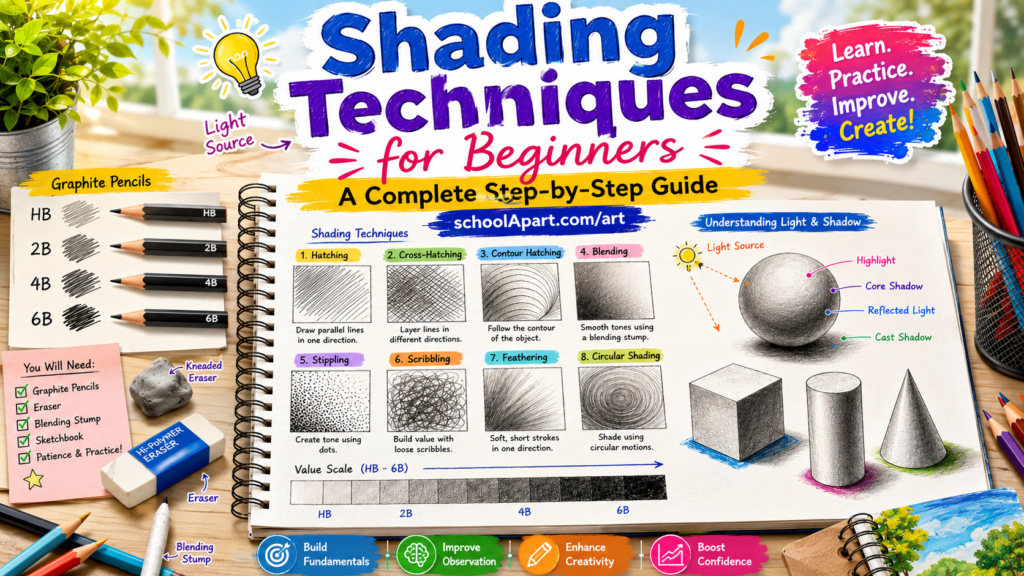
Shading Techniques for Beginners: A Complete Step-by-Step Guide
A good drawing is more than just accurate outlines. What makes an object look realistic is shading.
Shading gives drawings depth, form, texture, and dimension. Without it, even a perfectly drawn object can appear flat and lifeless.
Many beginners avoid shading because they think it’s difficult. However, learning to shade is simply about understanding how light interacts with objects and practicing a few essential techniques.
Whether you want to create realistic portraits, nature drawings, cartoon illustrations, or still-life sketches, mastering shading will dramatically improve your artwork.
In this complete guide, you’ll learn the fundamentals of shading, understand different pencil grades, control pencil pressure, and prepare yourself for advanced shading techniques.
What Is Shading?
Shading is the process of creating different tones, from light to dark, to show how light falls on an object.
Instead of using only outlines, artists use shading to create the illusion of:
- Depth
- Volume
- Form
- Texture
- Distance
- Realism
For example, compare these two drawings of a ball:
- A simple circle looks flat.
- A shaded sphere looks three-dimensional.
The difference is shading.
Why Is Shading Important?
Shading is one of the most valuable skills in drawing because it transforms simple sketches into realistic artwork.
Creates Depth
Shading makes flat drawings appear three-dimensional.
Objects gain visible volume and feel more realistic.
Shows Light Direction
Shading tells the viewer where the light is coming from.
Without consistent lighting, drawings often look confusing.
Improves Realism
Real objects are never one single color or tone.
Shading helps represent:
- Bright highlights
- Soft transitions
- Dark shadows
- Reflected light
These details make drawings more believable.
Adds Texture
Different shading styles can create the appearance of:
- Wood
- Metal
- Glass
- Fabric
- Hair
- Skin
- Stone
Texture brings life to artwork.
Creates Mood
Artists also use shading to create emotions.
For example:
- Soft shading creates calm scenes.
- Strong contrast creates dramatic effects.
- Gentle gradients create peaceful illustrations.
Understanding Light Before Shading
Before adding any shading, you must understand one simple rule:
Every shadow begins with a light source.
Without knowing where the light comes from, it is impossible to place shadows correctly.
Always decide the light direction before shading.
Examples:
- Light from the left
- Light from the right
- Light from above
- Light from below
- Back lighting
Keep this direction consistent throughout your drawing.
Understanding Values
Artists use the word value to describe how light or dark an area appears.
Good shading depends on using a wide range of values.
Highlight
The brightest part of an object.
This area receives the strongest light.
In graphite drawing, highlights are usually left as the white color of the paper.
Light Tone
The area receiving direct light.
It appears slightly darker than the highlight.
Mid-tone
The middle value between light and shadow.
This area creates smooth transitions.
Core Shadow
The darkest shadow found on the object itself.
It usually appears opposite the light source.
Reflected Light
Light often bounces off nearby surfaces.
This creates a thin lighter edge inside the shadow area.
Adding reflected light makes drawings more realistic.
Cast Shadow
When an object blocks light, it creates a shadow on another surface.
This is called the cast shadow.
Without cast shadows, objects may appear to float.
Understanding the Value Scale
One of the first exercises every beginner should practice is the value scale.
Draw a long rectangle and divide it into ten equal sections.
Create a gradual transition from:
- Pure white
- Very light gray
- Light gray
- Medium gray
- Dark gray
- Almost black
A value scale teaches you:
- Pencil pressure
- Tone control
- Smooth transitions
- Observation
Professional artists practice value scales regularly.
Choosing the Right Pencil Grades
Different pencils produce different darkness levels.
Using the correct pencil makes shading much easier.
HB Pencil
Best for:
- Construction lines
- Light sketches
- Initial outlines
Produces light, clean marks.
2B Pencil
Best for:
- Basic shading
- Soft shadows
- General drawing
A great all-purpose pencil for beginners.
4B Pencil
Best for:
- Medium-dark shading
- Richer values
- Portrait drawing
Produces smoother and darker graphite.
6B Pencil
Best for:
- Strong shadows
- High contrast
- Deep values
Ideal for creating dramatic effects.
8B Pencil
Best for:
- Very dark areas
- Bold contrast
- Final shadow details
Use carefully because it creates very dark marks.
Pencil Grades Explained: A Complete Guide to H, HB, B, 2B, 4B, 6B & More for Beginners
Which Pencil Should Beginners Buy?
A simple beginner set includes:
- HB
- 2B
- 4B
- 6B
These four pencils can create almost every value needed for beginner drawings.
Understanding Pencil Pressure
Many beginners believe darker shading requires a softer pencil.
While softer pencils help, pressure control is even more important.
A single HB pencil can produce many different tones depending on how hard you press.
Light Pressure
Produces:
- Soft values
- Construction lines
- Gentle transitions
Use for:
- Early sketching
- Highlights
- Light areas
Medium Pressure
Produces:
- Mid-tones
- General shading
Most of your drawing should use medium pressure.
Heavy Pressure
Produces:
- Dark shadows
- Strong contrast
Avoid using heavy pressure everywhere.
Too much dark shading removes depth and makes drawings appear flat.
How to Hold Your Pencil for Shading
Many beginners hold the pencil like they are writing.
While this works for details, it is not ideal for large shaded areas.
Professional artists often change their grip depending on the task.
Writing Grip
Best for:
- Fine details
- Sharp edges
- Small drawings
Overhand Grip
Hold the pencil farther back.
This grip creates:
- Smooth strokes
- Broad shading
- Better arm movement
It also reduces the chance of pressing too hard.
Side Grip
Instead of using the pencil tip, use the side of the graphite.
This creates:
- Soft gradients
- Smooth transitions
- Even shading
Excellent for backgrounds and large surfaces.
Preparing Your Drawing Before Shading
Before adding any shadows, complete these steps:
Step 1
Finish your construction drawing.
Step 2
Check proportions.
Correct mistakes now—not after shading.
Step 3
Decide the light source.
Remember:
Every shadow depends on it.
Step 4
Identify:
- Highlight
- Mid-tone
- Core shadow
- Reflected light
- Cast shadow
Visualizing these areas first makes shading much easier.
Step 5
Start with the lightest values.
It is always easier to make an area darker than to lighten one that has become too dark.
Beginner Shading Exercise #1
Draw a simple sphere.
Then:
- Choose a light source from the upper-left corner.
- Leave a small highlight.
- Add a light tone.
- Blend into a mid-tone.
- Create a core shadow.
- Add reflected light.
- Draw the cast shadow.
Repeat this exercise several times using different light directions.
It is one of the best ways to understand how light and shading work together.
Essential Shading Techniques Every Beginner Should Learn
There are many ways to create shadows in a drawing.
Different techniques produce different textures, moods, and artistic styles.
Professional artists often combine multiple techniques within a single artwork.
As a beginner, you should learn each technique separately before mixing them together.
1. Hatching
Hatching is one of the oldest and easiest shading techniques.
It uses a series of parallel lines to create different values.
The closer the lines are, the darker the area appears.
Best For
- Pencil drawings
- Architectural sketches
- Product sketches
- Technical illustrations
- Beginner practice
How to Practice
Draw several rows of parallel lines.
Experiment with:
- Wide spacing
- Medium spacing
- Very close spacing
Notice how the value changes.
Beginner Exercise
Draw a rectangle.
Shade it using only horizontal parallel lines.
Repeat using:
- Vertical lines
- Diagonal lines
2. Cross-Hatching
Cross-hatching builds on hatching.
Instead of one set of lines, add another layer that crosses the first.
Each additional layer increases the darkness.
Best For
- Portraits
- Animals
- Nature drawings
- Comic illustrations
Tips
- Keep line spacing consistent.
- Change line direction gradually.
- Don’t create random patterns.
Beginner Exercise
Draw a cube.
Shade one side with hatching.
Shade another side using cross-hatching.
Compare the results.
3. Contour Hatching
Contour hatching follows the shape of the object instead of using straight lines.
This technique helps objects look more three-dimensional.
Best For
- Faces
- Arms
- Fruits
- Animals
- Rounded objects
For example:
Instead of drawing straight lines across an apple, curve the lines around its surface.
The result immediately looks more realistic.
4. Blending
Blending creates smooth transitions between light and dark values.
This is one of the most popular techniques for realistic pencil drawings.
Blending Tools
- Blending stump
- Tissue paper
- Cotton bud
- Soft cloth
- Soft brush
Some artists also use clean fingers, but this may transfer natural skin oils onto the paper, so dedicated blending tools are usually a better choice.
Tips
- Blend gently.
- Don’t over-blend.
- Keep highlights clean.
Too much blending can make drawings look soft and lose important details.
5. Stippling
Stippling creates shading using tiny dots.
More dots create darker values.
Fewer dots create lighter values.
Best For
- Ink drawings
- Scientific illustrations
- Detailed artwork
- Textured surfaces
Although time-consuming, stippling develops excellent control and patience.
6. Scribbling
Scribbling uses controlled, overlapping random lines to create texture.
Unlike careless doodling, artistic scribbling is intentional.
Best For
- Trees
- Grass
- Rocks
- Hair
- Clouds
Vary the pressure and density to create different tones.
7. Feathering
Feathering uses short, soft strokes that gradually overlap.
The strokes resemble small feathers.
Best For
- Hair
- Fur
- Leaves
- Fabric
- Soft transitions
Keep the strokes flowing in the direction of the surface.
8. Circular Shading
Circular shading uses tiny overlapping circles instead of straight lines.
Because the circles blend naturally, this method creates very smooth gradients.
Best For
- Portraits
- Skin
- Fruits
- Smooth surfaces
Many realistic artists use circular shading for graphite portraits.
Combining Shading Techniques
Professional artists rarely rely on a single technique.
For example:
- Hatching for clothing
- Circular shading for skin
- Scribbling for trees
- Blending for portraits
- Stippling for textured backgrounds
Experiment with different combinations to discover your preferred style.
How to Shade Basic 3D Shapes
Learning to shade simple forms is one of the fastest ways to improve.
Every complex object can be simplified into these basic shapes.
1. Shading a Sphere
A sphere teaches almost every shading concept.
Steps
- Draw a clean circle.
- Choose a light source.
- Leave the highlight white.
- Add a light tone.
- Build the mid-tone.
- Darken the core shadow.
- Add reflected light.
- Draw the cast shadow.
The sphere is the best practice exercise for beginners.
2. Shading a Cube
A cube helps you understand flat surfaces.
Each visible face receives a different amount of light.
Example:
- Top face = Lightest
- Front face = Medium
- Side face = Darkest
Instead of smooth blending, keep each face mostly consistent in value.
3. Shading a Cylinder
A cylinder combines flat and curved surfaces.
Examples include:
- Bottles
- Cans
- Glasses
- Pillars
Steps
- Shade gradually around the curved surface.
- Keep one side brighter.
- Add a cast shadow underneath.
Smooth transitions are important.
4. Shading a Cone
A cone combines straight edges with curved shading.
Practice drawing:
- Ice cream cones
- Party hats
- Traffic cones
Observe how the shadow wraps around the surface.
Understanding Edge Quality
Not every edge should be sharp.
Artists classify edges into three main types.
Hard Edges
Best for:
- Metal
- Buildings
- Glass
- Sharp objects
Soft Edges
Best for:
- Skin
- Clouds
- Rounded objects
Lost Edges
Sometimes an edge almost disappears because the object and background have similar values.
Lost edges create a more natural and realistic appearance.
Beginner Shading Exercises
Practice these exercises regularly.
Exercise 1
Create a ten-step value scale.
Exercise 2
Shade five spheres using different light directions.
Exercise 3
Shade:
- Cube
- Cylinder
- Cone
Exercise 4
Draw an apple from real life.
Focus on:
- Highlight
- Core shadow
- Cast shadow
- Reflected light
Exercise 5
Practice each shading technique separately for ten minutes.
Rotate between:
- Hatching
- Cross-hatching
- Blending
- Circular shading
- Stippling
Tips for Better Shading
✔ Work from light to dark.
✔ Build values gradually.
✔ Keep your highlights clean.
✔ Avoid pressing too hard too early.
✔ Compare tones constantly.
✔ Observe real objects whenever possible.
✔ Rotate your paper if it helps you make smoother strokes.
Common Shading Mistakes Beginners Make
Even after learning different shading techniques, beginners often make a few common mistakes that prevent their drawings from looking realistic.
Understanding these mistakes—and knowing how to fix them—can dramatically improve your artwork.
Mistake 1: Pressing Too Hard Too Early
Many beginners start shading with heavy pencil pressure.
This creates dark marks that are difficult to erase or adjust later.
How to Fix It
Always build your values gradually.
Start with light pressure and slowly increase the darkness where needed.
Remember:
It’s much easier to make a drawing darker than to make it lighter.
Mistake 2: Ignoring the Light Source
Random shadows make drawings look confusing.
Every shadow should relate to a single light source.
How to Fix It
Before shading, decide:
- Where is the light coming from?
- Which area is the brightest?
- Where should the cast shadow fall?
Stay consistent throughout the drawing.
Mistake 3: Using Only One Pencil Grade
Some beginners use only an HB pencil for every part of the drawing.
While possible, it limits the range of values.
How to Fix It
Use multiple graphite pencils.
A beginner-friendly set includes:
- HB
- 2B
- 4B
- 6B
Each pencil helps create a wider range of tones.
Mistake 4: Over-Blending
Blending can create beautiful gradients, but too much blending removes texture and detail.
Drawings may end up looking soft or muddy.
How to Fix It
Blend only where smooth transitions are needed.
Keep some pencil strokes visible to preserve form and texture.
Mistake 5: Forgetting Reflected Light
Many beginners shade the entire shadow area dark.
Real objects often have a thin strip of reflected light inside the shadow.
How to Fix It
Observe real objects carefully.
Look for subtle light bouncing back from nearby surfaces.
Adding reflected light makes drawings appear more realistic.
Mistake 6: Flat Values
If every part of the drawing has similar darkness, the object loses depth.
How to Fix It
Use a full range of values:
- Highlight
- Light tone
- Mid-tone
- Core shadow
- Cast shadow
Greater value contrast creates stronger three-dimensional effects.
Mistake 7: Smudging the Drawing Accidentally
Dragging your hand across graphite can create unwanted smudges.
How to Fix It
Place a clean sheet of paper under your drawing hand while working.
This simple habit keeps your artwork neat.
Mistake 8: Rushing the Process
Shading requires patience.
Working too quickly often results in uneven transitions and inconsistent values.
How to Fix It
Work in layers.
Build your shading slowly instead of trying to finish everything at once.
Mistake 9: Ignoring Real References
Drawing only from imagination can lead to unrealistic lighting and shadows.
How to Fix It
Study real objects under different lighting conditions.
Notice:
- Highlight placement
- Shadow shape
- Reflected light
- Cast shadow
Observation is one of the best teachers.
Mistake 10: Not Practicing Regularly
Shading improves through repetition.
Practicing once in a while is less effective than short, regular sessions.
How to Fix It
Practice for 20–30 minutes most days of the week.
Consistency leads to steady improvement.
7-Day Shading Practice Plan
Day 1
Create a 10-step value scale.
Focus on smooth transitions.
Day 2
Practice shading spheres with different light directions.
Day 3
Shade cubes, cylinders, and cones.
Study how flat and curved surfaces react to light.
Day 4
Practice individual techniques:
- Hatching
- Cross-hatching
- Circular shading
Day 5
Draw and shade simple household objects.
Examples:
- Cup
- Bottle
- Apple
Day 6
Draw a simple still-life arrangement using two or three objects.
Focus on consistent lighting.
Day 7
Complete one finished drawing using everything you learned during the week.
Review your work and identify one area to improve next time.
Daily Shading Routine
A short, focused routine is more effective than occasional long sessions.
5 Minutes
Warm-up:
- Straight lines
- Circles
- Value scale
10 Minutes
Practice one shading technique.
Rotate between:
- Hatching
- Blending
- Circular shading
- Stippling
15 Minutes
Shade one real object.
Observe:
- Light direction
- Shadow shapes
- Value changes
Professional Tips to Improve Faster
- Observe before shading.
- Build values gradually.
- Keep highlights clean.
- Rotate your paper if needed.
- Practice basic forms before complex subjects.
- Use references from real life.
- Review your old drawings to track progress.
- Experiment with different pencil grades.
- Don’t be afraid to make mistakes.
- Enjoy the learning process.
Key Takeaways
- Shading transforms flat sketches into realistic drawings.
- Understanding light is the foundation of good shading.
- Value control is more important than pressing hard with the pencil.
- Different shading techniques create different textures and effects.
- Practice simple forms before attempting complex subjects.
- Use multiple pencil grades for a wider value range.
- Build dark areas gradually.
- Observe real objects regularly.
- Consistent practice leads to steady improvement.
Frequently Asked Questions (FAQ)
1. What is the easiest shading technique for beginners?
Hatching is often the easiest technique because it uses simple parallel lines and helps beginners develop control.
2. Which pencil is best for shading?
HB, 2B, 4B, and 6B graphite pencils are excellent choices for beginner shading.
3. How can I make my shading smoother?
Use light pencil pressure, build layers gradually, and blend carefully where needed.
4. Why does my shading look patchy?
Patchy shading usually results from uneven pressure or rushing the process. Practice creating smooth value scales.
5. Should I blend every drawing?
No. Blending is useful for realistic styles, but techniques like hatching and stippling intentionally leave visible marks.
6. What should I practice first?
Start with value scales and simple 3D shapes like spheres, cubes, cylinders, and cones.
7. Why is the light source important?
A consistent light source determines where highlights and shadows should appear, making the drawing believable.
8. How long does it take to improve shading?
With regular practice, many beginners notice better control and smoother transitions within a few weeks.
9. Can I shade with just one pencil?
Yes, but using multiple pencil grades provides greater flexibility and a wider range of tones.
10. Which objects are best for shading practice?
Simple objects such as apples, cups, bottles, balls, and boxes are ideal because they clearly show light and shadow.
11. How often should I practice shading?
Practicing for 20–30 minutes most days of the week is a good goal for beginners.
12. Is circular shading better than blending?
They serve different purposes. Circular shading creates smooth tones with pencil strokes, while blending softens transitions after shading.
13. Why do my drawings still look flat?
Check whether you have enough value contrast, a clear light source, and correctly placed cast shadows.
14. Should beginners learn realistic shading first?
Learning the fundamentals of realistic shading is beneficial because those skills apply to many drawing styles.
15. What’s the biggest secret to improving shading?
Consistent practice, careful observation, and patience are more important than expensive art supplies.
Shading is one of the most powerful skills an artist can develop. It turns simple outlines into convincing three-dimensional forms, adds depth and texture, and brings drawings to life.
Like any artistic skill, shading takes practice. Don’t expect perfection after your first few attempts. Instead, focus on understanding light, controlling your pencil, and practicing the essential techniques covered in this guide.
Begin with simple forms such as spheres and cubes, build your confidence step by step, and gradually move on to more detailed subjects.
Every drawing is an opportunity to improve.
Keep practicing, stay curious, and enjoy the creative journey.


Leave a Reply