

Learn how to make a water cycle model for a school project using simple materials. Follow easy steps to show evaporation, condensation, precipitation, and collection.
How to Make a Water Cycle Model
A water cycle model is a creative and educational way to understand how water moves between the Earth’s surface and the atmosphere. It helps students learn about evaporation, condensation, precipitation, and collection through a simple visual project.
You do not need expensive materials to make an attractive water cycle model. With cardboard, colored paper, cotton, glue, and a few basic craft supplies, you can create a 3D model that is suitable for a school science exhibition, classroom assignment, or science project.
In this guide, you will learn how to make a water cycle model step by step, label its main parts, explain how the water cycle works, and present your project confidently at school.
What Is the Water Cycle?
The water cycle is the continuous movement of water between the Earth’s surface and the atmosphere. Heat from the Sun causes water from oceans, rivers, lakes, and other wet surfaces to evaporate. Water vapor rises, cools, and forms tiny droplets in clouds through condensation. When the droplets become heavy enough, water falls back to Earth as precipitation.
Water then collects in rivers, lakes, oceans, and the ground. The cycle continues as water evaporates again.
The four main stages commonly shown in a school water cycle model are:
- Evaporation: Liquid water changes into water vapor because of heat.
- Condensation: Water vapor cools and changes into tiny liquid droplets that form clouds.
- Precipitation: Water falls from clouds as rain, snow, sleet, or hail.
- Collection: Water gathers in rivers, lakes, oceans, and other places.
Plants also release water vapor into the atmosphere through a process called transpiration.
Materials Required to Make a Water Cycle Model
Gather these simple materials before starting your project.
- A large piece of cardboard or a thick cardboard box
- Blue, green, white, yellow, and brown craft paper
- Cotton balls for clouds
- Blue paper or blue modeling clay for water
- Green paper or clay for hills and trees
- Scissors
- Glue or double-sided tape
- Pencil and ruler
- Markers or sketch pens
- Small paper strips for labels
- String or thin blue yarn to represent falling rain
- Arrow-shaped paper cutouts to show the direction of the cycle
Optional materials: Air-dry clay, recycled cardboard, small paper trees, and a clear plastic sheet for decoration.
Use child-safe scissors and non-toxic glue. Younger students should ask an adult for help when cutting thick cardboard.
How to Make a Water Cycle Model Step by Step
Step 1: Prepare the Base
Take a large piece of cardboard and place it horizontally on a flat surface. This will be the base of your water cycle model.
If the cardboard is thin, attach another layer underneath to make it stronger. Cover the base with blue paper to represent the water and sky, or use green and blue paper to create a landscape with water below and sky above.
Leave enough space to add the Sun, clouds, hills, rain, and labels.
Step 2: Create the Land and Water
Cut green paper or shape green modeling clay to make hills and land. Place them on one side of the cardboard.
Use blue paper, blue clay, or a painted section to represent a river, lake, or ocean along the bottom.
You can add small trees, rocks, and plants to make the landscape more realistic. Make sure the water area is large enough to show where evaporation begins and where water collects.
Step 3: Make the Sun
Cut a large yellow circle from craft paper. Add small triangular rays around the circle to make the Sun look bright.
Attach it near the top corner of your model. The Sun represents the source of energy that drives evaporation.
You can draw short rays pointing toward the water to show how solar heat helps water evaporate.
Step 4: Make the Clouds
Take a few cotton balls and gently pull them apart to create fluffy cloud shapes. Glue them near the top of the model.
You can also cut cloud shapes from white paper and attach a little cotton on top to give them a 3D appearance.
Leave enough space beneath the clouds for rain and labels. Clouds represent the stage where water vapor cools and condenses into tiny water droplets.
Step 5: Show Evaporation
Cut several upward-pointing arrows from white or light-blue paper. Place them between the water body and the clouds.
Write Evaporation beside the arrows.
These arrows show that water from rivers, lakes, and oceans changes into water vapor and rises into the atmosphere when it gains heat.
For a more detailed project, add a small label reading “Water vapor rises.” Remember that water vapor is an invisible gas; the arrows are only a visual representation.
Step 6: Show Condensation
Place a label reading Condensation beside the clouds.
Add small blue dots around or inside a cloud to represent tiny water droplets. You may draw a few upward arrows that end near the cloud to connect the evaporation stage with condensation.
Explain that as water vapor rises and cools, it changes into tiny liquid droplets or ice crystals. These gather to form clouds.
Step 7: Add Precipitation
Cut several thin blue paper strips or use short pieces of blue yarn to represent falling rain. Attach them underneath the clouds.
You can also cut small blue raindrop shapes from paper and glue them below the clouds.
Write Precipitation beside the rain.
Precipitation occurs when water falls from clouds to the Earth’s surface. It can take the form of rain, snow, sleet, or hail, depending on atmospheric conditions. For a simple school model, rain is the easiest form to illustrate.
Step 8: Show Collection
Make sure your blue river, lake, or ocean is clearly visible at the bottom of the model. Add arrows pointing toward the water body from the land.
Write Collection near the river or lake.
This stage shows how water gathers in rivers, lakes, oceans, and other water bodies. Some water also soaks into the ground and becomes groundwater.
Add a small label such as “Water collects and the cycle continues” to connect the collection stage to evaporation.
Step 9: Add Transpiration
For a more complete model, make one or two small trees using green paper, cardboard, or clay.
Place upward-pointing arrows near the trees and label them Transpiration.
Transpiration is the process by which plants release water vapor into the atmosphere, mainly through tiny openings in their leaves. It is an important part of the water cycle.
This extra feature can make your project more informative than a basic four-stage model.
Step 10: Add Directional Arrows and Labels
Arrange arrows to show the movement of water through the cycle:
Collection → Evaporation → Condensation → Precipitation → Collection
Make the arrows large enough to see from a short distance. Use a consistent color for arrows and a different color for stage names.
Check that each label is beside the correct part of the model. Clear labeling helps teachers and classmates understand your project quickly.
Step 11: Decorate and Finish the Model
Add a neat title at the top:
THE WATER CYCLE
You can also include a short subtitle such as “The Continuous Movement of Water on Earth.”
Decorate the remaining space with small plants, hills, a riverbank, or a few birds made from paper. Keep the decoration simple so the scientific process remains the main focus.
Finally, check that all parts are securely attached and that the model can be carried safely to school.
Water Cycle Model: How It Works
Your model illustrates how water moves through the environment in a continuous cycle.
| Stage | What happens? | What to show in the model |
|---|---|---|
| Evaporation | Heat changes liquid water into water vapor. | Upward arrows from the water |
| Condensation | Water vapor cools and forms tiny droplets. | Clouds |
| Precipitation | Water falls from clouds. | Blue paper raindrops or yarn |
| Collection | Water gathers on the Earth’s surface or enters the ground. | River, lake, ocean, or groundwater |
| Transpiration | Plants release water vapor. | Trees with upward arrows |
The water cycle does not have a single starting point. It is a continuous process, so you can begin explaining it at any stage.
Optional: Make a Simple Working Water Cycle Demonstration
If your teacher wants a small demonstration in addition to the 3D model, you can create a simple condensation experiment.
Materials
- A transparent, sealable plastic bag
- A small amount of water
- A blue marker or a drop of food coloring (optional)
- Tape
- A sunny window
Steps
- Pour a small amount of water into the plastic bag. Add a tiny amount of blue food coloring if desired.
- Seal the bag securely.
- Draw a simple Sun, clouds, and water line on the outside of the bag.
- Tape the bag upright to a sunny window, keeping it away from places where it could fall.
- Observe the bag over several hours. Tiny droplets may appear on its inside surface as water evaporates and then condenses.
What does this demonstrate?
Water may evaporate from the liquid, and some of the water vapor may condense into droplets on the cooler inner surface of the bag. The droplets may then run down the bag.
This is a simplified demonstration of evaporation and condensation, not a complete reproduction of the natural water cycle. The results depend on sunlight, temperature, and the surrounding conditions. Do not leave the bag where it can overheat or leak onto electrical equipment.
How to Make Your Water Cycle Project Attractive
Use these tips to make your school project neat, easy to understand, and suitable for an exhibition.
- Use a clear layout: Keep the Sun, clouds, land, and water in distinct areas.
- Choose readable labels: Write stage names in large, neat letters.
- Use arrows correctly: Make the direction of the cycle easy to follow.
- Add 3D elements: Cotton clouds, raised hills, and paper trees create depth.
- Explain every stage: Include a short description beside each main process.
- Use recycled materials: Reuse cardboard and leftover craft paper where possible.
- Avoid overcrowding: Decoration should not hide the water cycle stages.
- Make it sturdy: Reinforce the base so the project can be transported safely.
Short Explanation for a School Science Exhibition
You can use this simple presentation when explaining your model to your teacher or classmates:
“Good morning, everyone. My project is about the water cycle. The water cycle is the continuous movement of water between the Earth’s surface and the atmosphere.
First, the Sun heats water in rivers, lakes, and oceans. Some of this water evaporates and rises as water vapor. As the vapor cools, it condenses into tiny droplets and forms clouds. When the droplets become heavy enough, water falls as precipitation, such as rain. The water then collects in rivers, lakes, oceans, and the ground. Plants also release water vapor through transpiration.
This process continues again and again and helps maintain water movement throughout the environment. Thank you.”
Learning Benefits of a Water Cycle Model
Making a water cycle model helps students:
- Understand the main stages of the water cycle.
- Connect scientific terms with visual examples.
- Develop creativity and practical craft skills.
- Improve planning, measuring, cutting, and assembling skills.
- Practice explaining a scientific concept clearly.
- Learn why water is continually moving through the environment.
This project combines science learning with hands-on creativity, making it useful for classroom activities, homework, and science exhibitions.
Common Mistakes to Avoid
1. Missing a stage: Include evaporation, condensation, precipitation, and collection.
2. Incorrect arrow directions: Upward arrows should represent evaporation, while downward arrows should represent precipitation.
3. Confusing clouds with water vapor: Water vapor is an invisible gas. Clouds form from tiny droplets or ice crystals.
4. Too much decoration: Keep the scientific information easy to see.
5. Unclear labels: Use large, legible lettering and place each label near the correct feature.
6. Calling a static model a working model: A cardboard model illustrates the process. A demonstration with water and a sealed bag can show some of the processes under suitable conditions.
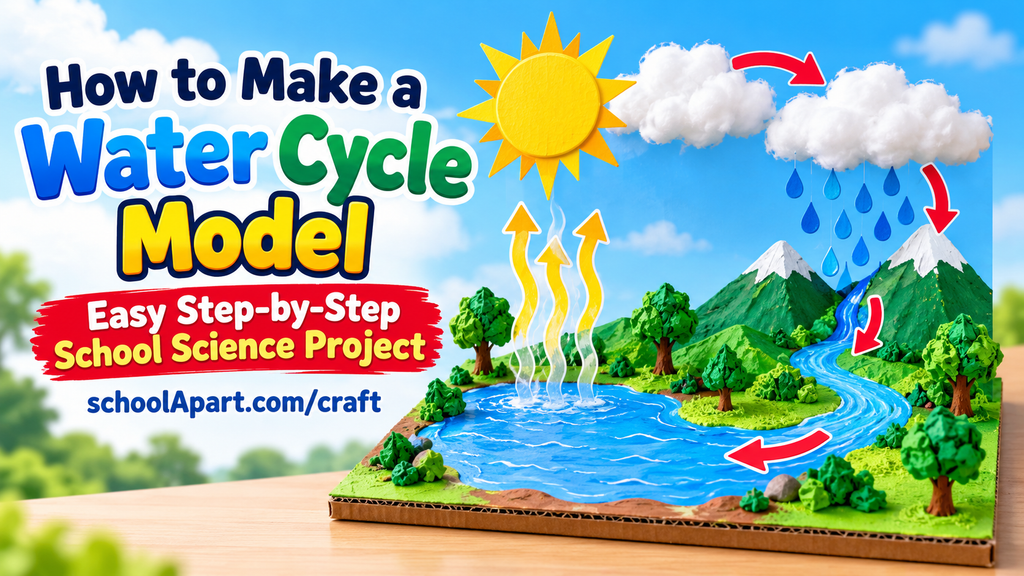
A water cycle model is an easy and meaningful school science project that can be made with simple, affordable craft materials. By showing the Sun, water bodies, clouds, rain, and directional arrows, students can explain evaporation, condensation, precipitation, and collection in a clear visual way.
For a more detailed project, add transpiration, groundwater, neat labels, and a short presentation. The most successful model is not necessarily the most complicated one; it is the one that explains the water cycle accurately and clearly.
Frequently Asked Questions (FAQ)
1. How do you make a water cycle model for a school project?
Use cardboard as a base, add a water body, land, a paper Sun, cotton clouds, and paper or yarn raindrops. Add arrows and labels to explain evaporation, condensation, precipitation, and collection.
2. What materials are needed for a water cycle model?
You can use cardboard, colored paper, cotton, glue, scissors, markers, blue yarn, and small labels. Modeling clay and recycled materials are optional.
3. What are the four main stages of the water cycle?
The four commonly taught stages are evaporation, condensation, precipitation, and collection.
4. What is evaporation in the water cycle?
Evaporation is the process in which liquid water changes into water vapor after gaining energy, usually from the Sun.
5. What is condensation?
Condensation occurs when water vapor cools and changes into tiny liquid droplets. These droplets can gather to form clouds.
6. What is precipitation?
Precipitation is water that falls from clouds to Earth’s surface as rain, snow, sleet, or hail.
7. What does collection mean in the water cycle?
Collection is the gathering of water in rivers, lakes, oceans, and other water bodies. Some water also enters the soil and becomes groundwater.
8. Can I make a 3D water cycle model?
Yes. Use cotton clouds, raised cardboard hills, clay landforms, paper trees, and layered cardboard to create a 3D effect.
9. How can I make a water cycle model using waste materials?
Reuse a cardboard box, scrap paper, leftover packaging, and small pieces of string. Make sure all materials are clean and safe to handle.
10. How can I show evaporation in my model?
Place upward-pointing arrows between the water body and the clouds. Label them “Evaporation” to show water vapor rising into the atmosphere.
11. How can I show precipitation?
Attach blue paper raindrops or short blue yarn pieces underneath the clouds. Add a label explaining that precipitation falls from clouds to Earth.
12. What is transpiration in the water cycle?
Transpiration is the release of water vapor from plants, mainly through tiny openings in their leaves.
13. Is a cardboard water cycle model a working model?
A cardboard model is generally a visual or static model. It explains the stages but does not physically reproduce the complete water cycle. A separate condensation demonstration can show some of the processes.
14. How long does it take to make a water cycle model?
A simple cardboard model may take around one to two hours, depending on the design, materials, and drying time.
15. Which colors should I use for a water cycle project?
Blue works well for water, white for clouds, yellow for the Sun, green for land and plants, and brown for soil or hills. These are visual choices rather than scientific requirements.
16. Why is the water cycle important?
The water cycle moves water through the environment, helps replenish water bodies and groundwater, and supports plants, animals, and people.
17. Does the water cycle have a starting point?
No. The water cycle is continuous. For teaching purposes, it is often explained starting with evaporation.
18. How can I explain my water cycle model in class?
Explain the stages in order: the Sun heats water, water evaporates, vapor cools and condenses into clouds, precipitation falls, and water collects again. You can also mention transpiration.
19. Can younger students make this project?
Yes. Younger students can make a simple paper-and-cardboard model with adult supervision for cutting and assembly.
20. How can I make my water cycle model stand out in a science exhibition?
Use a sturdy base, clear labels, correctly directed arrows, raised 3D elements, and a short explanation. Accuracy and clarity matter more than excessive decoration.

Leave a Reply