
Learn how to draw simple objects using basic shapes such as circles, rectangles, ovals, and triangles with easy step-by-step examples for beginners.
How to Draw Simple Objects Using Basic Shapes
Meta Description: Learn how to draw simple objects using basic shapes such as circles, rectangles, ovals, and triangles with easy step-by-step examples for beginners.
Slug: how-to-draw-simple-objects-using-basic-shapes
Drawing simple objects becomes much easier when you learn how to break them into basic shapes.
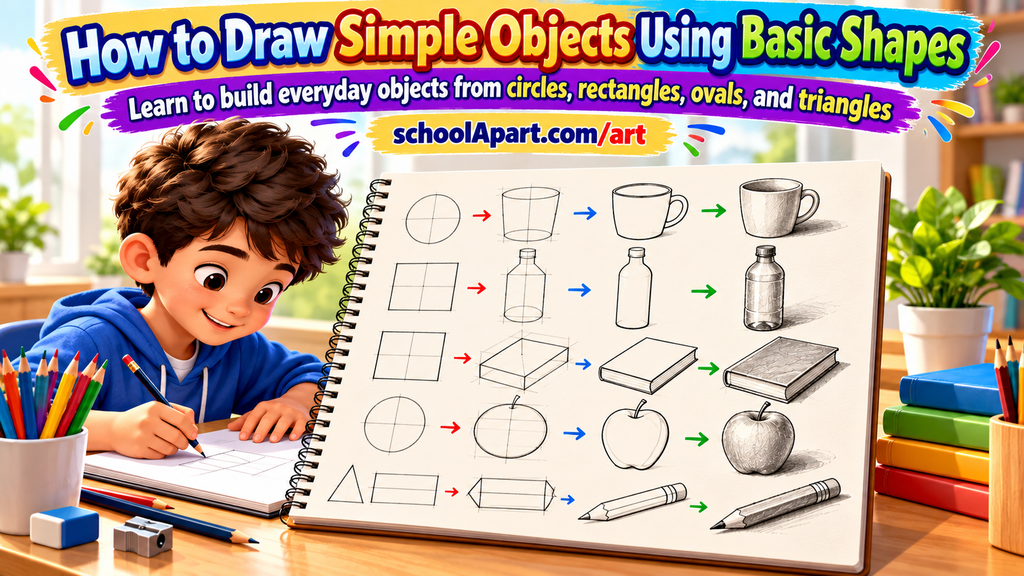
A cup may look complicated at first, but it can often be built from an oval, a rectangle, and a few curved lines. A book can begin with rectangles. An apple can start with a circle or oval. Even a simple house can be constructed using rectangles and triangles.
This approach helps beginners understand the structure of an object before adding details.
In this guide, you will learn how to use basic shapes to draw simple objects step by step, how to combine shapes, how to check proportions, and how to turn simple construction lines into finished sketches.
Why Use Basic Shapes to Draw Objects?
Many objects around us have simple underlying forms.
Instead of trying to copy every visible line immediately, you can first identify the main shapes.
For example:
- A book can be built from rectangles.
- A ball can begin with a circle.
- A bottle can use rectangles and ovals.
- An apple can begin with an oval.
- A house can combine rectangles and triangles.
- A cup can use an oval and curved shapes.
This makes drawing more manageable for beginners.
The basic idea is:
Observe → Identify Shapes → Combine Shapes → Check Proportion → Add Details
The Basic Shapes You Can Use
You do not need many shapes to begin.
Some of the most useful are:
- Circle
- Oval
- Square
- Rectangle
- Triangle
- Curved shape
These shapes can be combined and modified to create many different objects.
If you want to learn the foundation first, see:
You can also practice the individual construction method in:
How to Draw Using Basic Shapes
How to Turn Basic Shapes Into Objects
The process is simple.
Step 1: Observe the Object
Look carefully at the object before drawing.
Ask:
- What is its overall shape?
- Is it tall or wide?
- Which basic shapes can you see?
- Which part is the largest?
- Where are the smaller parts?
Step 2: Draw the Main Shape
Start with the largest or most important shape.
Do not add small details yet.
Step 3: Add Supporting Shapes
Add smaller shapes for handles, openings, sides, or other major parts.
Step 4: Check Proportion
Compare the width and height of different parts.
Step 5: Refine the Outline
Use curved or cleaner lines to turn the construction shapes into the actual object.
Step 6: Add Details
Finally, add small features, texture, and simple shading.
How to Draw a Simple Cup Using Basic Shapes
A cup is a good object for beginners because its structure is relatively simple.
Step 1: Draw an Oval
Start with an oval for the opening of the cup.
Keep it light.
Step 2: Add the Body
Draw two slightly curved lines downward from the sides of the oval.
Connect them at the bottom with a curved line.
Step 3: Add the Handle
Use a curved shape or oval-like form on one side of the cup.
Step 4: Refine the Shape
Clean up the construction lines and make the cup’s outline smoother.
Step 5: Add Simple Details
You can add:
- Inner edge of the opening
- Base
- Handle details
- Light shading
The final drawing can be simple. The goal is to understand how the object was constructed.
How to Draw a Simple Bottle Using Basic Shapes
A bottle can be broken into several simple parts.
Step 1: Draw the Main Body
Use a tall rectangle or elongated shape as a guide for the body.
Step 2: Add the Neck
Place a smaller rectangle above the body.
Step 3: Add the Opening
Use a small oval for the top.
Step 4: Shape the Shoulders
Connect the neck to the wider body using curved lines.
Step 5: Refine the Outline
Replace the construction lines with smoother bottle contours.
Step 6: Add Details
Add a cap, label, or simple shading if needed.
The important part is to establish the overall height and width before adding details.
How to Draw a Simple Book Using Basic Shapes
A book is an excellent subject for practicing rectangles and perspective.
Step 1: Draw the Front Shape
Start with a rectangle or slightly angled quadrilateral.
Step 2: Add the Thickness
Draw another set of lines to show the thickness of the book.
Step 3: Connect the Corners
Connect the corresponding corners.
Step 4: Add the Pages
Use several simple lines along the side to suggest pages.
Step 5: Add the Cover
Darken or refine the outer edges.
You can keep the drawing very simple at first.
This exercise is useful because it combines shape, proportion, and perspective.
How to Draw an Apple Using Basic Shapes
An apple can begin with a simple circle or oval.
Step 1: Draw a Light Circle
Do not worry about making it perfect.
Step 2: Adjust the Shape
Apples are not perfect circles, so slightly modify the sides.
Step 3: Add the Top
Create a small indentation near the top.
Step 4: Add the Stem
Use two simple lines for the stem.
Step 5: Add a Leaf
A leaf can be constructed from a simple pointed oval.
Step 6: Add Light Shading
Use gentle shading to suggest the rounded form.
This is a good exercise for learning how a simple shape can become a more natural-looking object.
How to Draw a Simple Pencil Using Basic Shapes
A pencil is mostly made from long, simple geometric forms.
Step 1: Draw a Long Rectangle
This creates the main body.
Step 2: Add the Tip
Use a triangle at one end.
Step 3: Add the Eraser
Use a small rectangle at the other end.
Step 4: Add the Ferrule
Add a small section between the body and eraser.
Step 5: Add Details
Draw a few lines to suggest the wooden tip and pencil surface.
This exercise helps beginners practice long straight lines and proportion.
How to Draw a Simple House Using Basic Shapes
A house is one of the easiest subjects to build from geometric shapes.
Step 1: Draw a Rectangle
This becomes the main building.
Step 2: Add a Triangle
Place a triangle above the rectangle to create the roof.
Step 3: Add the Door
Use a smaller rectangle.
Step 4: Add Windows
Use small squares or rectangles.
Step 5: Add Details
You can add:
- Chimney
- Roof lines
- Path
- Trees
- Clouds
The important lesson is that a recognizable drawing can begin with only a few simple shapes.
How to Draw a Simple Plant Pot
A plant pot is another useful beginner exercise.
Step 1: Draw an Oval
Use an oval for the top opening.
Step 2: Add the Pot Body
Draw two slightly slanted lines downward.
Step 3: Connect the Bottom
Use a curved line.
Step 4: Add the Plant
Use simple curved lines for stems.
Step 5: Add Leaves
Start each leaf with a simple oval or pointed shape.
Step 6: Add Light Shading
Shade one side of the pot and some areas underneath the leaves.
How to Draw a Simple Box
A box is useful for practicing basic shapes and perspective.
Step 1: Draw the Front Face
Start with a rectangle.
Step 2: Add the Side
Draw another set of lines extending from the corners.
Step 3: Add the Top
Connect the upper points.
Step 4: Refine the Edges
Make the main edges cleaner.
Step 5: Add Simple Shading
Use slightly darker shading on one side.
This exercise can help you understand how flat shapes can represent three-dimensional forms.
How to Combine Multiple Basic Shapes
Some objects require more than one shape.
For example, a simple toy car might contain:
- Rectangles for the body
- Circles for the wheels
- Smaller rectangles for windows
A tree might contain:
- Rectangle for the trunk
- Circles or ovals for foliage
A simple lamp might contain:
- Rectangle for the stand
- Oval for the base
- Triangle or trapezoid-like shape for the shade
The key is to think of the object as a collection of simple forms rather than one complicated picture.
Use Light Construction Lines
When building an object from shapes, keep your first lines light.
This allows you to:
- Change the size
- Correct the position
- Adjust proportions
- Remove unnecessary lines
- Refine the final outline
For example, when drawing a bottle, do not immediately make the final outline dark.
First establish the body, neck, and opening.
Once everything looks right, refine the contours.
Check Proportion Before Adding Details
A drawing can contain the correct basic shapes but still look incorrect if their sizes are wrong.
For example:
- A bottle may be too short.
- A cup handle may be too large.
- A book may be too narrow.
- A window may be too large compared with a house.
Before adding details, compare:
Height → Width → Major Parts → Relative Sizes
For more help with this skill, see:
Proportion in Drawing: How to Get Size and Shape Right
Basic Shapes Are Only the Starting Point
It is important to remember that basic shapes are construction tools.
You do not have to leave every object looking like a collection of geometric shapes.
Once the structure is correct, you can:
- Refine the outline.
- Remove unnecessary construction lines.
- Add smaller features.
- Add texture.
- Add light and shadow.
The shapes help you build the object.
The final drawing can look much more natural.
Add Simple Shading After Construction
Shading should usually come after the basic structure is working.
First make sure the object has:
- Correct shape
- Correct proportion
- Correct position
Then think about light.
For example, if the light is coming from the upper left:
- The upper-left area may be lighter.
- The opposite side may be darker.
- A cast shadow may appear on the surface.
You can practice this further with:
Shading Techniques for Beginners
Practice With Real Objects
After practicing from examples, try objects around you.
Look around your home or classroom for:
- Water bottle
- Pencil
- Notebook
- Cup
- Eraser
- School bag
- Lunch box
- Fruit
- Small toy
- Plant pot
Choose one object.
Before drawing, identify its basic shapes.
Then build the drawing step by step.
This turns shape practice into real observational sketching.
For another useful practice method, see:
Object Sketching for Beginners: How to Draw What You See
Practice Simple Objects From Different Angles
Once you can draw an object from one viewpoint, try another.
For example, draw a cup:
- From the front
- From slightly above
- From the side
Notice how the opening changes shape.
From a higher viewpoint, the opening may look more visible.
From a lower viewpoint, it may appear narrower.
This helps you move beyond copying a fixed symbol and start observing the actual object.
Common Mistakes Beginners Make
Starting With Details
Adding labels, patterns, buttons, or textures too early can make the drawing difficult to correct.
Better: Build the main structure first.
Making Every Shape Perfect
Your construction shapes do not need to be mathematically perfect.
Their purpose is to help you understand the structure.
Ignoring Proportion
A correct circle and rectangle can still produce an inaccurate object if they are the wrong sizes.
Always compare the relationships between parts.
Pressing Too Hard
Heavy construction lines are difficult to correct.
Use light pencil pressure at the beginning.
Copying Symbols Instead of Observing
A beginner may draw a bottle from memory using a familiar “bottle symbol.”
Instead, look carefully at the actual bottle.
Notice its exact shape, width, curves, and proportions.
Adding Shading Too Early
Shading cannot fix a badly constructed object.
Get the structure right first.
A Simple Practice Exercise
Choose three objects:
Object 1: Cup
Object 2: Bottle
Object 3: Book
For each object:
Step 1
Observe it for one minute.
Step 2
Identify the basic shapes.
Step 3
Draw the shapes lightly.
Step 4
Combine the shapes.
Step 5
Check proportion.
Step 6
Refine the outline.
Step 7
Add simple details.
Step 8
Add light shading if appropriate.
This exercise can be repeated with different objects.
A 15-Minute Basic Shapes Drawing Routine
If you are a beginner, try this short practice routine.
3 Minutes — Shape Warm-Up
Draw:
- Circles
- Ovals
- Squares
- Rectangles
- Triangles
5 Minutes — Build an Object
Choose one simple object and construct it from basic shapes.
4 Minutes — Refine
Correct the proportions and clean up the outline.
3 Minutes — Add Details
Add a few important details or simple shading.
With regular practice, you can gradually increase the complexity of the objects you draw.
From Basic Shapes to Object Sketching
Learning to draw objects from basic shapes is an important step toward observational sketching.
The progression can look like this:
Basic Shapes
↓
Combine Shapes
↓
Build Simple Objects
↓
Check Proportion
↓
Add Details
↓
Add Light and Shadow
↓
Object Sketching
Once you are comfortable with this process, you can move toward more complex subjects and still life drawings.
What Should You Draw Next?
After practicing simple objects, try combining several objects into one drawing.
For example:
Bottle + Cup + Book
Then try:
Apple + Cup + Book
This introduces you to simple still life arrangements.
You will begin to think about:
- Relative size
- Position
- Overlapping shapes
- Proportion
- Negative space
- Light and shadow
This is a natural next step toward still life drawing.
Final Tips for Drawing Objects Using Basic Shapes
Remember these simple rules:
- Observe before drawing.
- Identify the main shapes.
- Start with light construction lines.
- Draw the largest shapes first.
- Add smaller shapes afterward.
- Check height and width.
- Compare the size of different parts.
- Refine the outline only after the structure works.
- Add details after the main form is correct.
- Add shading at the end.
- Practice with real objects.
- Draw the same object from different angles.
Basic shapes are one of the simplest ways to understand how objects are constructed.
Instead of trying to draw a complicated object all at once, break it into circles, ovals, rectangles, squares, triangles, and other simple forms. Build the main structure first, check the proportions, refine the outline, and then add details.
With practice, you will begin to see basic shapes inside many everyday objects.
A cup becomes an oval and curved form.
A book becomes a set of rectangles.
A bottle becomes a combination of simple forms.
A house becomes rectangles and triangles.
This way of thinking can make drawing less intimidating and help you develop stronger observation and sketching skills.
Start with simple objects around you, practice regularly, and gradually move toward more complex subjects.
The goal is not to draw complicated objects immediately. The goal is to learn how simple shapes can become meaningful drawings.
Quick Takeaway
Observe → Identify Shapes → Build the Object → Check Proportion → Refine → Add Details → Shade
Once you understand this process, many everyday objects become easier to draw.
Frequently Asked Questions (FAQ)
How do you draw simple objects using basic shapes?
Start by observing the object, identify its main basic shapes, draw those shapes lightly, combine them, check the proportions, and then refine the outline and add details.
What objects can be drawn using basic shapes?
Many everyday objects can be constructed using basic shapes, including cups, bottles, books, apples, pencils, boxes, houses, and plant pots.
What basic shapes are useful for drawing objects?
Circles, ovals, squares, rectangles, triangles, and simple curved forms are useful for constructing many objects.
Why should beginners use basic shapes for drawing?
Basic shapes simplify complex objects and help beginners understand structure, proportion, and the relationship between different parts.
Can I draw realistic objects using basic shapes?
Yes. Basic shapes are often used as construction guides. After the structure is correct, you can refine the outline and add details, texture, and shading.
How do I draw a cup using basic shapes?
You can start with an oval for the opening, add curved lines for the body, and use a curved shape for the handle before refining the outline.
How do I draw a bottle using basic shapes?
A bottle can begin with a tall main body, a smaller neck, and an oval opening. Curved lines can then be used to refine the shoulders and sides.
How do basic shapes help with proportion?
They allow you to compare the height, width, and size of different parts before adding details.
Should I use dark lines when starting a drawing?
It is usually easier to begin with light construction lines so you can adjust shapes and proportions before making the final outline darker.
Should I add shading before drawing the details?
It is generally easier to establish the main structure and details first, then add shading after the form and proportions are correct.
Can I practice this technique with real objects?
Yes. Cups, bottles, books, pencils, fruits, boxes, and other simple objects are excellent subjects for practice.
Is drawing with basic shapes good for children?
Yes. Breaking objects into simple shapes can make drawing easier to understand and can help young learners develop observation and construction skills.
What should I practice after drawing simple objects?
You can move toward object sketching, proportion practice, still life drawing, perspective, and more complex subjects.


Leave a Reply