

Learn how to make a plant cell model for a school project using cardboard, clay, and simple materials. Follow easy steps to build and label a 3D plant cell.
How to Make a Plant Cell Model for a School Project
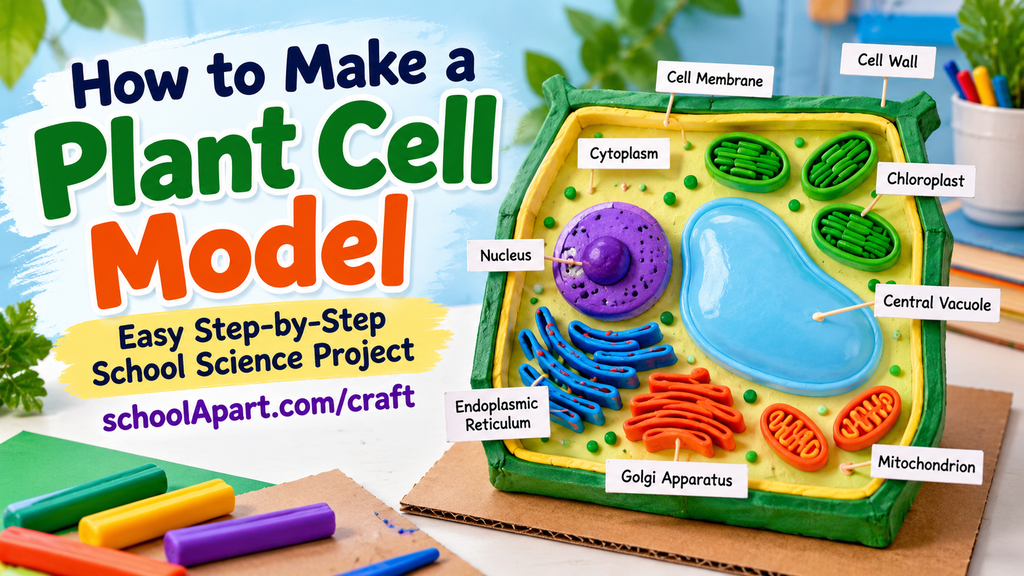
A plant cell model is a useful and creative way to learn about the structure of plant cells. It helps students understand important cell parts, such as the cell wall, cell membrane, nucleus, cytoplasm, chloroplasts, and vacuole.
You can make an attractive 3D plant cell model using simple materials such as cardboard, colored paper, modeling clay, glue, and markers. The finished model can be used for a school science assignment, biology project, classroom display, or science exhibition.
How to Make a Solar System Model for a School Project
In this guide, you will learn how to make a plant cell model for a school project step by step, how to label the main organelles, what each part does, and how to explain your project confidently.
What Is a Plant Cell?
A plant cell is the basic structural and functional unit of a plant. Like other eukaryotic cells, it contains a nucleus and other specialized structures called organelles.
Plant cells have some features that distinguish them from animal cells. These include a rigid cell wall outside the cell membrane, chloroplasts in many photosynthetic plant cells, and a large central vacuole.
Plant cells come in different shapes and sizes depending on their functions. For a school model, a simple rectangular or oval shape is commonly used to show the main parts clearly.
Materials Required to Make a Plant Cell Model
Gather the following materials before starting your project.
Basic Materials
- A thick piece of cardboard or foam board for the base
- Green, yellow, blue, pink, purple, and other colored modeling clay
- Colored paper or craft foam
- Glue or double-sided tape
- Pencil and ruler
- Scissors
- Markers or sketch pens
- Small paper strips for labels
- Toothpicks or short paper sticks to hold labels
- A printed or hand-drawn plant cell diagram for reference
Optional Materials
- A shallow cardboard tray
- Air-dry clay
- Recycled packaging material
- Small beads or paper balls for selected organelles
- A clear plastic sheet for a protective cover
Safety tip: Use child-safe glue and scissors. Younger students should ask an adult for help when cutting thick cardboard or using sharp craft tools.
How to Make a Plant Cell Model Step by Step
Step 1: Prepare the Base
Take a thick piece of cardboard or foam board. Cut it into a rectangular shape large enough to hold your plant cell model and labels.
A rectangular base works well because plant cells are often shown with a box-like outline in school diagrams. You can also use a shallow cardboard tray to create a raised 3D model.
Write the title “PLANT CELL MODEL” on a separate card. You can attach it to the front of the base after completing the model.
Step 2: Create the Cell Wall
Use green or light-brown modeling clay to form a thick rectangular border on the base.
The cell wall is the outer supporting layer of a plant cell. It helps the cell maintain its shape and provides structural support.
Make the border thick enough to distinguish it from the cell membrane. Keep the middle area open because you will place the other cell parts inside it.
If you prefer paper crafts, cut a large rectangle from thick green craft foam or layered cardboard to create the outer boundary.
Step 3: Add the Cell Membrane
Inside the cell wall, create a thinner rectangular outline using a different color of clay or a narrow strip of colored paper.
The cell membrane lies just inside the cell wall. It regulates the movement of substances into and out of the cell.
Make sure the inner outline is visible and does not merge with the outer wall. This distinction is important for accurate labeling.
Step 4: Make the Cytoplasm
Fill the area inside the cell membrane with a thin layer of light-colored modeling clay, such as pale yellow or light blue.
This layer represents the cytoplasm, the material inside the cell membrane in which many cell components are located.
Do not cover the entire area with thick clay. Leave enough space for the nucleus, central vacuole, chloroplasts, and other organelles.
Step 5: Create the Nucleus
Choose purple, pink, or another contrasting color of clay. Shape it into a small circle or oval and place it inside the cell.
The nucleus contains most of the cell’s genetic material and helps regulate many cell activities.
For additional detail, make a smaller circle inside the nucleus to represent the nucleolus. Label it separately if your class has studied it.
Keep the nucleus large enough to be visible but small enough to leave space for the other structures.
Step 6: Make the Large Central Vacuole
Use blue modeling clay or a large piece of blue paper to create a prominent central vacuole.
In many mature plant cells, the central vacuole occupies a large portion of the cell. It stores water and various dissolved substances and helps maintain internal pressure that supports the cell.
Place the vacuole near the center of your model. Arrange the nucleus and other organelles around it rather than covering the entire model with the vacuole.
This large central structure is one of the most recognizable features of a typical plant cell diagram.
Step 7: Add the Chloroplasts
Make several small oval shapes using green clay. Add short darker-green lines or dots if you want to show internal detail.
Place the chloroplasts around the cytoplasm, often near the outer region of the model.
Chloroplasts contain chlorophyll and carry out photosynthesis in many plant cells. Photosynthesis allows plants to use light energy to make sugars from carbon dioxide and water.
For accuracy, remember that not every plant cell contains chloroplasts. Many root cells, for example, do not have them.
Step 8: Make the Mitochondria
Use orange or red clay to create a few small oval shapes. Add a wavy line on each one to represent the folded inner membrane.
Place them in the cytoplasm without overcrowding the model.
Mitochondria are involved in cellular respiration, a process through which cells release usable energy from food molecules.
Plant cells have mitochondria as well as chloroplasts; the two organelles perform different functions.
Step 9: Add the Endoplasmic Reticulum
Roll thin strips of clay into curved lines and place them near the nucleus. You can create two sections:
- Rough endoplasmic reticulum (rough ER): Add tiny dots to represent ribosomes attached to its surface.
- Smooth endoplasmic reticulum (smooth ER): Use smooth, undotted strips.
The endoplasmic reticulum is a network of membranes involved in making and processing proteins and lipids. Rough ER has ribosomes attached to its surface, while smooth ER does not.
Keep the structures simple so they remain distinguishable.
Step 10: Create the Golgi Apparatus
Use several short, curved strips of clay stacked near one side of the nucleus.
Make the strips slightly different in length to create a layered appearance. Add a few small dots or circles nearby to represent vesicles if desired.
The Golgi apparatus modifies, sorts, and packages certain proteins and lipids for transport to their destinations.
Step 11: Add Ribosomes
Use tiny dots of clay or marker dots to represent ribosomes.
Ribosomes are responsible for protein synthesis. They can be found free in the cytoplasm or attached to rough endoplasmic reticulum.
If your model is small, add only a few clearly visible dots and explain that they represent many ribosomes.
Step 12: Add the Other Parts If Needed
Depending on your class level, you can add additional organelles, such as:
- Peroxisomes: Small structures involved in various metabolic reactions.
- Nucleolus: A region inside the nucleus involved in producing ribosomal components.
- Vesicles: Small membrane-bound structures that transport or store materials.
You do not need to include every structure in a basic school project. Focus first on the parts your teacher expects you to identify.
Step 13: Label Every Main Part
Prepare small labels using paper strips. Write each organelle’s name clearly and attach the labels using short paper sticks or folded paper tabs.
For a basic model, label:
- Cell wall
- Cell membrane
- Cytoplasm
- Nucleus
- Central vacuole
- Chloroplast
- Mitochondrion
- Endoplasmic reticulum
- Golgi apparatus
- Ribosomes
Make sure each label points to the correct structure. If two structures are close together, use longer label lines to avoid confusion.
Step 14: Add the Title and Finish the Model
Attach the title card to the front or top of the base. Write your name, class, and subject on a separate card if required by your school.
Check that the model is stable, the labels are readable, and each organelle is easy to distinguish by color and shape.
Allow glue or air-dry clay to dry completely before transporting the project.
Your 3D plant cell model is now ready for a school assignment or science exhibition.
Plant Cell Model: Parts and Their Functions
Use this table as a reference when preparing your labels and presentation.
| Cell part | Main function |
|---|---|
| Cell wall | Provides support, protection, and shape |
| Cell membrane | Regulates movement of substances into and out of the cell |
| Cytoplasm | Medium in which many cellular components are located and many reactions occur |
| Nucleus | Contains most of the genetic material and helps regulate cell activities |
| Central vacuole | Stores water and dissolved substances and helps maintain internal pressure |
| Chloroplast | Carries out photosynthesis in photosynthetic plant cells |
| Mitochondrion | Helps release usable energy through cellular respiration |
| Endoplasmic reticulum | Helps make and process proteins and lipids |
| Golgi apparatus | Modifies, sorts, and packages certain cellular products |
| Ribosomes | Make proteins |
| Nucleolus | Produces components used to assemble ribosomes |
| Peroxisome | Performs several metabolic and breakdown reactions |
The exact size, number, and arrangement of organelles vary between different plant cells. A school model is a simplified representation rather than an exact picture of every plant cell.
How to Make a Plant Cell Model Without Clay
If you do not have modeling clay, you can still make an attractive plant cell model using paper and recycled materials.
- Take a rectangular piece of cardboard as your base.
- Use layered green paper or cardboard to represent the cell wall.
- Add a thinner inner rectangle to show the cell membrane.
- Use colored paper cutouts for the nucleus, central vacuole, and chloroplasts.
- Use small paper strips and circles to represent the endoplasmic reticulum, Golgi apparatus, mitochondria, and ribosomes.
- Attach each structure with glue or small folded paper supports to create a raised effect.
- Add clear labels beside each organelle.
This paper-based version is affordable, lightweight, and easy to transport. It is especially useful for students who want a neat model without purchasing extra materials.
Plant Cell Model: How to Make It More Attractive
Follow these tips to improve the appearance and clarity of your project.
- Use contrasting colors: Make the cell wall, cell membrane, nucleus, vacuole, and chloroplasts visually distinct.
- Make the vacuole prominent: A large central vacuole is an important feature of many mature plant cells.
- Keep labels readable: Use consistent lettering and avoid placing labels over the organelles.
- Create a 3D effect: Use layered cardboard or modeling clay to give each part some height.
- Add a cutaway-style layout: Keep the internal structures visible instead of covering them with too much decoration.
- Use a sturdy base: Reinforce the cardboard if the model is heavy.
- Avoid overcrowding: Include the structures relevant to your class level.
- Check scientific accuracy: Ensure each label points to the correct organelle and its function is explained correctly.
Plant Cell Model vs Animal Cell Model
Plant and animal cells share many structures, but there are some important differences.
| Feature | Plant cell | Animal cell |
|---|---|---|
| Cell wall | Present | Absent |
| Cell membrane | Present | Present |
| Chloroplasts | Present in many photosynthetic cells | Absent |
| Central vacuole | Usually large in mature plant cells | Usually smaller vacuoles or vesicles |
| General shape | Often more regular because of the cell wall | Often more flexible and varied |
| Nucleus | Present | Present |
| Mitochondria | Present | Present |
Both plant and animal cells are eukaryotic cells. A plant cell model should not suggest that every plant cell has exactly the same shape or contains chloroplasts.
Short Explanation for a School Science Exhibition
You can use this short presentation when explaining your model.
“Good morning, everyone. My project is a model of a plant cell.
A plant cell is the basic structural and functional unit of a plant. It contains different parts called organelles, and each part has a specific role.
The cell wall gives the cell support and shape, while the cell membrane controls the movement of substances into and out of the cell. The nucleus contains most of the genetic material and helps regulate cell activities. The large central vacuole stores water and other substances and helps maintain internal pressure.
Chloroplasts carry out photosynthesis in many plant cells. Mitochondria help release usable energy through cellular respiration. Other structures, such as ribosomes, the endoplasmic reticulum, and the Golgi apparatus, help the cell make and process important substances.
This model shows the main structures of a plant cell in a simple 3D form. Thank you.”
Learning Benefits of a Plant Cell Model
Making a plant cell model helps students:
- Understand the structure of a plant cell.
- Identify major organelles and their functions.
- Learn the differences between plant and animal cells.
- Connect textbook diagrams with a three-dimensional representation.
- Develop creativity and hands-on craft skills.
- Practice planning, measuring, shaping, and labeling.
- Improve confidence when presenting science projects.
Common Mistakes to Avoid
1. Confusing the cell wall and cell membrane: The cell wall is outside the cell membrane in a plant cell.
2. Making every organelle the same size: The model should show the central vacuole as a prominent feature of many mature plant cells.
3. Forgetting labels: A model is much more useful for learning when its structures are clearly identified.
4. Mislabeling chloroplasts: Chloroplasts are found in many photosynthetic plant cells, but not in every plant cell.
5. Confusing mitochondria and chloroplasts: Chloroplasts carry out photosynthesis; mitochondria are involved in cellular respiration.
6. Adding too many details: Focus on the organelles required for your class level.
7. Using a weak base: A sturdy base makes the model easier to carry and display.
A plant cell model is a useful school science project that combines biology learning with hands-on creativity. By using cardboard, modeling clay, colored paper, and simple craft materials, you can create a clear 3D representation of the cell wall, cell membrane, nucleus, central vacuole, chloroplasts, and other organelles.
The key to a successful project is not the number of decorations but the accuracy of the structures, the clarity of the labels, and your ability to explain each part. With a neat design and a short presentation, your plant cell model can become an effective learning tool for a classroom assignment or science exhibition.
Frequently Asked Questions (FAQ)
1. How do you make a plant cell model for a school project?
Prepare a cardboard base, create the cell wall and cell membrane, add the cytoplasm, and place the nucleus, central vacuole, chloroplasts, mitochondria, and other organelles inside. Label each structure clearly.
2. What materials are needed to make a plant cell model?
You can use cardboard, modeling clay, colored paper, glue, markers, scissors, and small paper strips for labels. Recycled materials can also be used.
3. How do you make a 3D plant cell model?
Use modeling clay to shape the organelles and place them inside a raised rectangular cell wall. Alternatively, use layered cardboard and paper cutouts to create a raised paper model.
4. What are the main parts of a plant cell?
Commonly taught parts include the cell wall, cell membrane, cytoplasm, nucleus, central vacuole, chloroplasts, mitochondria, endoplasmic reticulum, Golgi apparatus, and ribosomes.
5. What is the function of the cell wall?
The cell wall provides structural support and protection and helps maintain the shape of the plant cell.
6. What is the function of the cell membrane?
The cell membrane regulates the movement of substances into and out of the cell.
7. Why is the central vacuole important in a plant cell?
The central vacuole stores water and dissolved substances and helps maintain internal pressure, which supports the structure of many plant cells.
8. What do chloroplasts do?
Chloroplasts carry out photosynthesis in photosynthetic plant cells. They contain chlorophyll, which absorbs light energy.
9. What is the function of the nucleus?
The nucleus contains most of the cell’s genetic material and helps regulate many cell activities.
10. What is the difference between a plant cell and an animal cell?
Plant cells have a cell wall and often have chloroplasts and a large central vacuole. Animal cells do not have a cell wall or chloroplasts and generally have a more flexible shape.
11. Can I make a plant cell model without clay?
Yes. Use cardboard, colored paper, craft foam, or recycled packaging to create the cell outline and organelles. Layering the materials can create a 3D effect.
12. How can I make a plant cell model using waste materials?
Reuse clean cardboard, packaging, scrap paper, and leftover craft materials. Cut or shape these into the cell wall, membrane, and organelles, then attach labels.
13. How long does it take to make a plant cell model?
A simple paper model may take one to two hours. A detailed clay model may take longer, especially if the clay or glue needs time to dry.
14. Which colors should I use for a plant cell model?
You can use green for the cell wall or chloroplasts, blue for the vacuole, purple for the nucleus, and contrasting colors for other organelles. These are visual choices, not fixed scientific color codes.
15. Does every plant cell have chloroplasts?
No. Many photosynthetic plant cells contain chloroplasts, but some plant cells, such as many root cells, do not.
16. What is the function of mitochondria in a plant cell?
Mitochondria are involved in cellular respiration, which releases usable energy from food molecules.
17. What should I write on the labels of a plant cell model?
Include the name of each structure and, if space allows, a short description of its function. Prioritize the organelles required by your teacher.
18. How can I make my plant cell model stand out in a science exhibition?
Use contrasting colors, clear labels, a sturdy base, and raised 3D organelles. Prepare a short explanation of the main structures and their functions.
19. Is a plant cell model suitable for younger students?
Yes. Younger students can make a simplified model using colored paper and cardboard with adult help for cutting and assembly.
20. What is the purpose of a plant cell model?
It helps students visualize the structure of a plant cell, identify its organelles, understand their functions, and explain how the parts work together.






Leave a Reply