
Learn easy coloring techniques for beginners, including layering, blending, hatching, stippling, gradients, texture, and simple practice exercises for students.
Coloring Techniques for Beginners
Meta Description: Learn easy coloring techniques for beginners, including layering, blending, hatching, stippling, gradients, texture, and simple practice exercises for students.
Slug: coloring-techniques-for-beginners
Coloring is more than simply filling an area with a color. The way you apply, layer, blend, and combine colors can change how your artwork looks and feels.
For beginners, learning a few simple coloring techniques can make drawings cleaner, more interesting, and more expressive.
You do not need expensive art materials to practice these techniques. Colored pencils, crayons, markers, or even simple drawing tools can help you develop basic coloring skills.
In this guide, you will learn useful coloring techniques for beginners, how to practice them, when to use them, common mistakes to avoid, and simple exercises that can help you improve.
What Are Coloring Techniques?
Coloring techniques are different methods of applying and combining color to create different effects in artwork.
For example, you can use:
- Light and dark pressure
- Layering
- Blending
- Hatching
- Cross-hatching
- Stippling
- Gradients
- Circular strokes
- Back-and-forth strokes
- Texture-building techniques
Different techniques can create different visual effects.
A smooth blend may work well for a sky, while short lines may work better for hair, grass, or other textures.
Why Should Beginners Learn Coloring Techniques?
Learning techniques helps you gain more control over your coloring.
Instead of applying color in exactly the same way everywhere, you can choose a technique based on what you want to create.
Practicing coloring techniques can help you:
- Improve color control
- Create smoother areas
- Make colors look more interesting
- Create light and dark effects
- Add texture
- Reduce uneven coloring
- Understand how different tools behave
- Develop your own coloring style
The goal is not to use every technique in every drawing.
The goal is to understand what each technique can do.
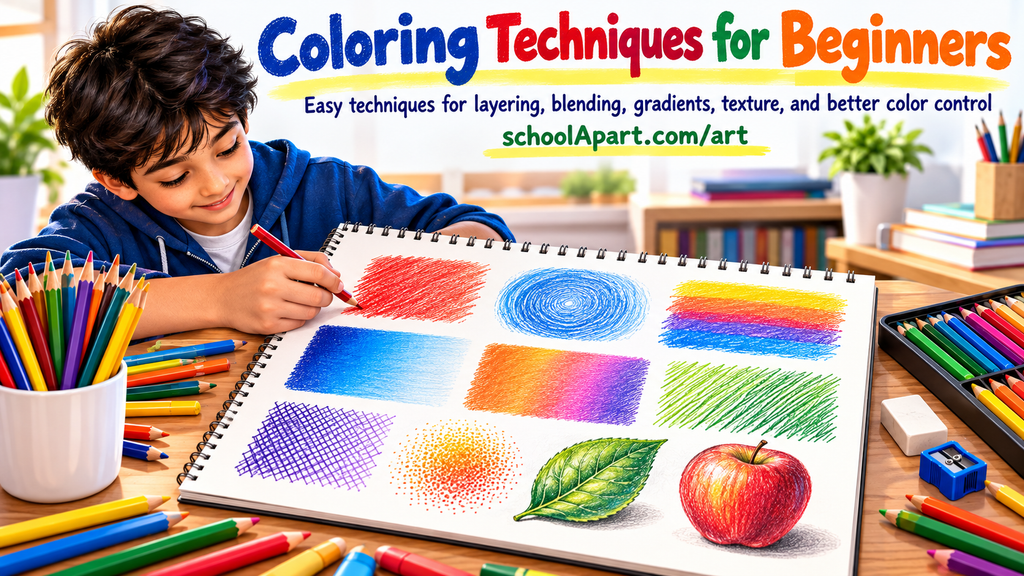
1. Back-and-Forth Coloring
Back-and-forth coloring is one of the easiest techniques for beginners.
Move the coloring tool repeatedly from one side to the other using controlled strokes.
How to Practice
- Draw a small rectangle.
- Start coloring from one side.
- Move across the shape.
- Return in the opposite direction.
- Keep the strokes close together.
- Try to keep the pressure consistent.
This technique works particularly well for filling simple areas.
Practice Tip
Try coloring three boxes:
- Light pressure
- Medium pressure
- Stronger pressure
Compare the results.
You will quickly notice how pressure changes the appearance of the color.
2. Circular Coloring
Circular coloring uses small overlapping circular movements instead of straight strokes.
This can help create a more even-looking color layer.
How to Practice
- Draw a small shape.
- Use small circular movements.
- Keep the circles relatively small.
- Overlap the movements.
- Build the color gradually.
Circular strokes can be useful when you want to reduce the appearance of visible straight pencil lines.
3. Layering Colors
Layering means applying multiple light layers of color instead of one heavy layer.
This is one of the most useful techniques for colored pencils.
For example, you might build a green leaf using:
- A light yellow-green layer
- A green layer
- A darker green layer
Each layer changes the appearance of the previous one.
How to Practice
Draw three identical shapes.
Color:
Shape 1: One light layer
Shape 2: Two layers
Shape 3: Three or more layers
Compare how the color becomes richer and darker.
Beginner Tip
Start with lighter layers.
It is easier to make a color darker gradually than to make an overly dark area lighter.
4. Blending
Blending means creating a smoother transition between colors or between light and dark areas.
You can practice blending with colored pencils, crayons, or suitable art materials.
Simple Two-Color Blending Exercise
Choose two related colors.
For example:
Light blue + dark blue
- Apply the light blue first.
- Apply the darker blue from the opposite side.
- Overlap the colors in the middle.
- Add another light layer over the transition area.
- Gradually build the colors.
The goal is to create a gradual transition rather than a sharp dividing line.
5. Gradient Coloring
A gradient is a gradual change from one color intensity to another.
For example:
Dark → Medium → Light
You can create a gradient using pressure.
Simple Exercise
Draw a long rectangle.
Start with stronger pressure at one end.
Gradually reduce the pressure as you move toward the other end.
Try to create:
Dark → Medium → Light
This is a useful exercise for learning color control.
6. Hatching
Hatching uses a series of parallel lines to create visual tone or texture.
Although hatching is often discussed as a drawing and shading technique, it can also be used with colored pencils and other coloring tools.
How to Practice
Draw a small square.
Fill it using:
- Short parallel lines
- Long parallel lines
- Closely spaced lines
- Widely spaced lines
Changing the spacing can change how dark or light the area appears.
7. Cross-Hatching
Cross-hatching builds on hatching.
Instead of using lines in only one direction, you add another set of lines crossing the first set.
For example:
/////
followed by:
\\\
The overlapping lines create a stronger visual texture and darker appearance.
This technique can be useful when you want a more textured effect rather than a completely smooth color.
8. Stippling
Stippling uses small dots to create tone or texture.
The more dots you place in an area, the denser and darker it can appear.
Practice Exercise
Draw a rectangle.
Create:
- Light area → fewer dots
- Medium area → more dots
- Dark area → many closely placed dots
Try changing the spacing rather than simply making every dot darker.
Stippling can be useful for creating interesting textures.
9. Pressure Control
Pressure control is not exactly a separate coloring technique, but it is one of the most important skills for beginners.
The amount of pressure you apply affects the color intensity.
Try practicing three levels:
Light Pressure
Creates a soft, lighter layer.
Medium Pressure
Creates a stronger color.
Heavy Pressure
Creates a darker, more intense layer.
Practice moving gradually from light pressure to stronger pressure.
This will help you create smoother transitions.
10. Color Mixing Through Layering
You do not always need to mix colors physically.
With colored pencils, you can place one color over another to create a different visual effect.
For example:
Yellow + light blue
may create a greenish appearance when layered carefully.
Try experimenting with combinations such as:
- Yellow + blue
- Blue + red
- Yellow + red
- Light green + yellow
- Blue + purple
Always test combinations on scrap paper first.
For a broader understanding of color relationships, see:
11. Using Warm and Cool Colors
Colors can also create different visual feelings depending on whether they appear warmer or cooler.
Warm Colors
Examples include:
- Red
- Orange
- Yellow
Cool Colors
Examples include:
- Blue
- Green
- Some purples
You can experiment with warm and cool versions of the same subject.
For example, try coloring one leaf using different greens and another using a cooler blue-green combination.
This can help you understand how color choices change the appearance of artwork.
12. Creating Light and Dark Areas
Good coloring does not always mean using the same color intensity everywhere.
You can create depth by using lighter and darker areas.
For example, imagine coloring a round fruit.
One side can be:
Light
while the opposite side can gradually become:
Darker
This can make the fruit appear more rounded.
Before coloring, imagine where the light is coming from.
Then keep the light side lighter and gradually build darker color toward the opposite side.
13. Coloring With Highlights
A highlight is an area that appears lighter because it receives more light.
You can create highlights by:
- Leaving some paper uncolored
- Using a lighter color
- Adding a lighter layer
- Using an appropriate blending or lifting method depending on the medium
For beginners, the simplest method is often to plan the highlight before coloring.
Do not automatically color every part of the drawing with the same intensity.
14. Texture Coloring
Different objects have different surfaces.
A smooth apple does not look like a rough tree trunk.
A piece of fabric does not look like metal.
You can suggest texture by changing your coloring technique.
Smooth Texture
Use:
- Small controlled strokes
- Layering
- Blending
Rough Texture
Use:
- Short irregular strokes
- Dots
- Broken lines
Grass
Try:
- Short upward strokes
- Different shades of green
- Slight variations in direction
Wood
Try:
- Long irregular lines
- Different brown tones
- Small variations in pressure
The technique should match the surface you are trying to represent.
15. Directional Coloring
The direction of your strokes can help communicate the form of an object.
For example:
- Curved strokes can follow a round object.
- Long strokes can follow a long object.
- Short strokes can suggest texture.
Imagine coloring a cylinder.
Instead of making completely random marks, try allowing your strokes to follow the curved surface.
This can help the coloring support the object’s form.
16. Two-Color Gradient Practice
This is a useful beginner exercise.
Choose two related colors.
For example:
Light green + dark green
Step 1
Apply the light color over the entire area.
Step 2
Add the darker color to one side.
Step 3
Reduce pressure as you move toward the center.
Step 4
Layer the lighter color over the transition.
Step 5
Repeat gently until the transition looks smoother.
Try the exercise with different color combinations.
17. Coloring Within the Lines
Staying inside the outline is a useful beginner skill.
However, do not worry if your early attempts are not perfectly neat.
To improve control:
- Use smaller strokes near edges.
- Reduce pressure near narrow areas.
- Rotate the paper when necessary.
- Work slowly around corners.
- Use lighter layers first.
As your hand control improves, your coloring will become cleaner.
18. Choosing the Right Technique
Different techniques work better for different purposes.
| Goal | Useful Technique |
|---|---|
| Fill a simple area | Back-and-forth strokes |
| Smooth color | Circular strokes |
| Richer color | Layering |
| Smooth transition | Blending |
| Light-to-dark effect | Gradient |
| Line texture | Hatching |
| Stronger line texture | Cross-hatching |
| Dotted texture | Stippling |
| Rounded form | Directional strokes |
| Surface texture | Short or varied strokes |
You do not have to use only one technique.
Combining techniques can often produce better results.
Common Coloring Mistakes Beginners Make
Pressing Too Hard
Heavy pressure can make colors difficult to adjust.
Try: Build color gradually.
Using Only One Layer
A single layer can sometimes look flat.
Try: Add several light layers.
Using Random Stroke Directions
Random strokes can make the surface look uneven.
Try: Let your strokes follow the shape when appropriate.
Using the Same Pressure Everywhere
This can make the artwork look flat.
Try: Practice light, medium, and dark pressure.
Adding Too Many Colors
More colors do not automatically make artwork better.
Try: Start with a small, controlled palette.
Ignoring Light Direction
If every area is equally dark, the subject may look flat.
Try: Decide where the light is coming from before coloring.
Rushing Around the Edges
Fast coloring near edges can create messy outlines.
Try: Slow down and use shorter strokes near boundaries.
Easy Coloring Exercises for Beginners
Exercise 1: Pressure Scale
Draw five boxes.
Color them using:
- Very light pressure
- Light pressure
- Medium pressure
- Strong pressure
- Heavy pressure
Compare the results.
Exercise 2: Layering Scale
Use one color.
Create:
1 layer → 2 layers → 3 layers → 4 layers → 5 layers
Notice how the color changes.
Exercise 3: Gradient
Create:
Dark → Medium → Light
Try to make the transition gradual.
Exercise 4: Two-Color Blend
Choose two related colors and blend them in the middle.
Exercise 5: Texture Practice
Create small squares using:
- Smooth coloring
- Hatching
- Cross-hatching
- Stippling
- Short strokes
This gives you a simple reference sheet of techniques.
A Simple 15-Minute Coloring Practice Routine
You can practice for just 15 minutes.
3 Minutes — Warm-Up
Practice:
- Light pressure
- Medium pressure
- Strong pressure
4 Minutes — Technique Practice
Choose one technique:
- Layering
- Blending
- Hatching
- Stippling
5 Minutes — Small Drawing
Apply the technique to a simple subject.
3 Minutes — Review
Ask:
- Was my pressure controlled?
- Did I stay within the outline?
- Did the colors look even?
- Did the technique suit the subject?
- What can I improve tomorrow?
How to Practice Coloring With Different Materials
Different coloring tools behave differently.
Colored Pencils
Good for:
- Layering
- Blending
- Gradients
- Detailed coloring
Crayons
Good for:
- Bold color
- Simple layering
- School artwork
- Texture experiments
Markers
Good for:
- Strong, clear colors
- Flat areas
- Simple illustrations
Because different materials behave differently, practice the same technique with different tools and compare the results.
How to Improve Your Coloring Skills
Improvement comes from focused practice.
Instead of coloring complete pictures every time, spend some sessions practicing individual techniques.
For example:
Monday: Pressure control
Tuesday: Layering
Wednesday: Blending
Thursday: Gradients
Friday: Texture
Saturday: Complete coloring
Sunday: Review
This makes it easier to identify which skills need more practice.
Use Simple Subjects First
You do not need complicated drawings to practice coloring.
Good beginner subjects include:
- Fruits
- Leaves
- Flowers
- Simple objects
- Clouds
- Houses
- School supplies
- Cartoon-style objects
- Simple patterns
Start with simple shapes and gradually increase the complexity.
Combine Techniques Carefully
Once you are comfortable with individual techniques, combine them.
For example, when coloring an apple you might use:
Layering + Blending + Pressure Control + Highlighting
For grass:
Layering + Short Strokes + Color Variation
For a simple wooden object:
Layering + Directional Strokes + Hatching
The goal is not to use as many techniques as possible.
Use the technique that helps communicate the subject.
Final Tips for Better Coloring
Remember these simple rules:
- Start with light layers.
- Practice pressure control.
- Build colors gradually.
- Use blending when appropriate.
- Try different stroke directions.
- Use hatching and stippling for texture.
- Plan highlights before coloring.
- Think about the direction of light.
- Choose techniques based on the subject.
- Practice one technique at a time.
- Keep a small technique practice sheet.
- Do not worry about making every drawing perfect.
Learning coloring techniques can make your artwork more controlled, interesting, and expressive.
You do not need to master everything at once.
Start with simple techniques such as back-and-forth strokes, circular coloring, layering, pressure control, and gradients. Then experiment with blending, hatching, cross-hatching, stippling, texture, and directional coloring.
The most important thing is regular practice.
Try one technique at a time, apply it to simple subjects, and compare your results. Over time, you will learn which techniques work best for different materials, colors, surfaces, and types of artwork.
Remember:
Color → Observe → Practice → Experiment → Improve
With patience and regular practice, coloring can become much more than filling spaces—it can become a way to create depth, texture, light, and visual expression.
Quick Takeaway
Start simple, build gradually, and practice with purpose.
A useful beginner progression is:
Pressure Control → Layering → Blending → Gradients → Texture → Combining Techniques
Frequently Asked Questions
What are coloring techniques?
Coloring techniques are different methods of applying, layering, blending, and controlling color to create different effects in artwork.
What is the easiest coloring technique for beginners?
Back-and-forth coloring with controlled pencil or crayon strokes is one of the easiest techniques to practice.
How can beginners improve their coloring skills?
Practice pressure control, layering, blending, gradients, and texture regularly. Short focused exercises can help build control.
What is layering in coloring?
Layering means applying multiple light layers of color instead of using heavy pressure to create the final color immediately.
What is blending in coloring?
Blending is the process of creating a smoother transition between colors or between light and dark areas.
What is gradient coloring?
Gradient coloring creates a gradual transition from one color intensity to another, such as dark to medium to light.
What is hatching in coloring?
Hatching uses parallel lines to create tone or texture. It can be used with colored pencils and other coloring materials.
What is cross-hatching?
Cross-hatching uses overlapping sets of lines in different directions to create stronger tone or texture.
What is stippling in coloring?
Stippling uses small dots to create texture or different levels of tone.
How can I color smoothly with colored pencils?
Use light layers, controlled strokes, and gradual pressure. Circular movements and careful layering can also help create smoother areas.
How do I make colors darker without pressing too hard?
Build the color gradually by adding multiple layers instead of applying heavy pressure immediately.
How can I create light and dark areas when coloring?
Decide where the light is coming from, keep the light areas lighter, and gradually build darker color on the opposite side.
How can I create texture with coloring?
Use different stroke types depending on the surface. Short irregular strokes, dots, hatching, and directional lines can suggest different textures.
Which coloring technique is best for beginners?
There is no single technique that works best for every drawing. Back-and-forth strokes, layering, pressure control, and simple gradients are useful techniques to start with.
Can I use these techniques with crayons?
Yes. Many basic techniques can be adapted to crayons, although the results will differ from colored pencils or markers.
How long should I practice coloring each day?
Even 10–15 minutes of focused practice can be useful for beginners.
Should I learn color theory before coloring techniques?
Basic color knowledge is helpful, but you can learn techniques and color theory alongside each other.
What should I practice after learning basic coloring techniques?
You can move on to color mixing, choosing colors, creating textures, and applying multiple techniques to complete drawings.

Leave a Reply