

Learn how to start drawing step by step with this beginner-friendly guide. Discover drawing tools, basic techniques, shapes, lines, and simple exercises to improve your art skills.
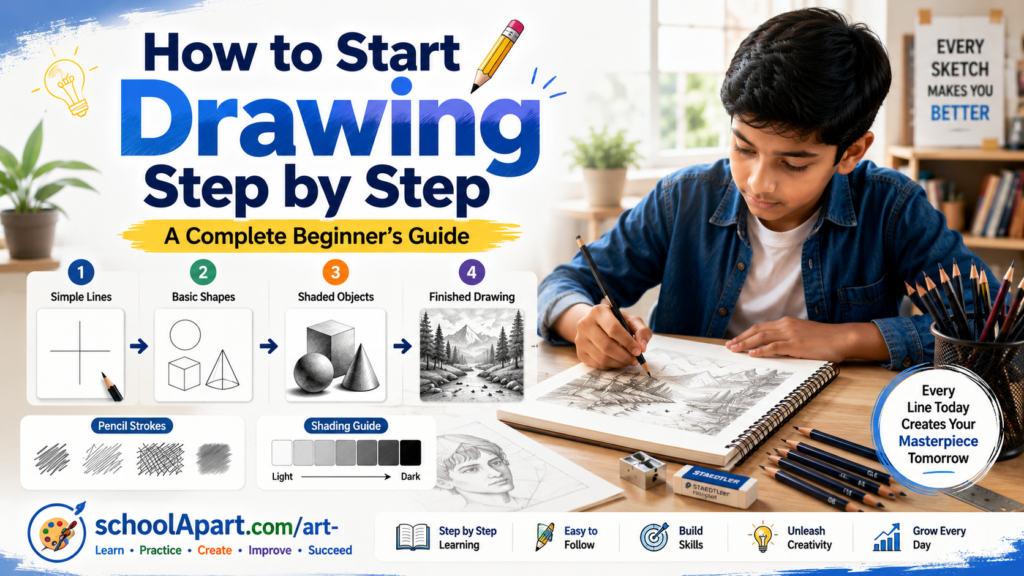
How to Start Drawing Step by Step: A Complete Beginner’s Guide
Have you ever looked at a beautiful drawing and thought:
“I wish I could draw like that.”
Many beginners believe that artists are born with special talent. While some people may have a natural interest in art, drawing is a skill that anyone can learn through practice and proper guidance.
Just like learning a language or playing a musical instrument, drawing improves with regular practice.
You don’t need expensive tools or years of experience to begin. A simple pencil, an eraser, some paper, and the willingness to practise are enough to start your artistic journey.
In this complete beginner’s guide, you will learn how to start drawing step by step, understand the basic skills required, choose the right tools, and build a strong foundation for becoming a better artist.
Can Anyone Learn Drawing?
Yes, anyone can learn drawing.
Drawing is not only about creating beautiful pictures. It is about learning how to:
- Observe objects carefully.
- Understand shapes and forms.
- Control your hand movements.
- Represent ideas visually.
- Practice patience and creativity.
Children, teenagers, and adults can all improve their drawing skills with consistent practice.
The difference between a beginner and an experienced artist is usually not talent—it is practice, observation, and learning the right techniques.
Drawing Is a Skill, Not Just Talent
Many beginners make the mistake of thinking:
“I cannot draw because I am not talented.”
This mindset can stop you from improving.
Professional artists were also beginners once. They learned by:
- Practising basic shapes.
- Studying objects around them.
- Making mistakes.
- Improving through repetition.
A person who practises drawing for 15–30 minutes every day can make significant progress over time.
Why Should You Learn Drawing?
Drawing is not only an artistic activity. It develops many useful skills.
Improves Observation Skills
Artists learn to notice:
- Shapes
- Sizes
- Details
- Light and shadow
- Textures
These observation skills are useful in many creative fields.
Develops Creativity
Drawing allows you to express:
- Ideas
- Stories
- Imagination
- Emotions
It helps you think visually and creatively.
Improves Focus and Concentration
Drawing requires attention to small details, which helps improve concentration.
For school students, drawing activities can support:
- Focus
- Patience
- Problem-solving skills
- Creative thinking
Builds Confidence
Completing a drawing creates a sense of achievement.
With every finished artwork, beginners become more confident in their abilities.
Basic Drawing Tools for Beginners
You don’t need a large collection of art supplies when starting.
A simple beginner drawing kit is enough.
1. Graphite Pencils
Pencils are the most important drawing tool.
Different pencil grades create different effects.
Common beginner pencils include:
| Pencil Grade | Use |
|---|---|
| HB | Basic outlines and everyday sketching |
| 2B | General drawing and light shading |
| 4B | Medium shading |
| 6B | Dark shadows and contrast |
A combination of HB, 2B, 4B, and 6B pencils is enough for most beginner drawings.
(Related: Pencil Grades Explained)
2. Sketchbook
A sketchbook is your personal practice space.
It helps you:
- Track improvement.
- Store ideas.
- Practise regularly.
- Experiment without fear.
Choose a sketchbook with:
- Good-quality paper.
- Comfortable size.
- Enough pages for regular practice.
Remember, a sketchbook is meant for practice—not perfection.
3. Eraser
An eraser is not only for correcting mistakes.
Artists use erasers to:
- Create highlights.
- Improve details.
- Remove unwanted marks.
- Adjust shading.
Useful types:
Vinyl Eraser
Good for clean corrections.
Kneaded Eraser
Useful for lifting graphite softly and creating highlights.
4. Pencil Sharpener
A sharp pencil gives better control.
A good sharpener helps create:
- Fine lines.
- Detailed drawings.
- Cleaner shading.
Avoid very cheap sharpeners that break pencil tips frequently.
5. Drawing Paper
Paper quality affects your drawing experience.
Beginners can start with:
- Sketchbook paper
- Drawing sheets
- Medium-weight paper
For advanced techniques, artists may choose specialized papers for graphite, charcoal, or coloured pencils.
Understanding Basic Drawing Lines
Before drawing complex objects, beginners should practise different types of lines.
Lines are the foundation of every drawing.
Straight Lines
Straight lines are used for:
- Buildings
- Objects
- Borders
- Technical drawings
Practice drawing:
- Horizontal lines
- Vertical lines
- Diagonal lines
Try to create smooth lines without using a ruler.
Curved Lines
Curved lines are important for drawing:
- Faces
- Flowers
- Animals
- Natural objects
Practice creating:
- Small curves
- Large curves
- Spiral shapes
Zigzag Lines
Zigzag lines help create:
- Patterns
- Textures
- Decorative elements
Parallel Lines
Parallel lines are useful for:
- Shading practice
- Texture creation
- Creating patterns
Try drawing multiple lines with equal spacing.
Line Practice Exercise for Beginners
Spend 10 minutes daily practising:
- Straight lines
- Curves
- Circles
- Spirals
- Waves
- Zigzags
This simple exercise improves hand control and prepares you for more advanced drawings.
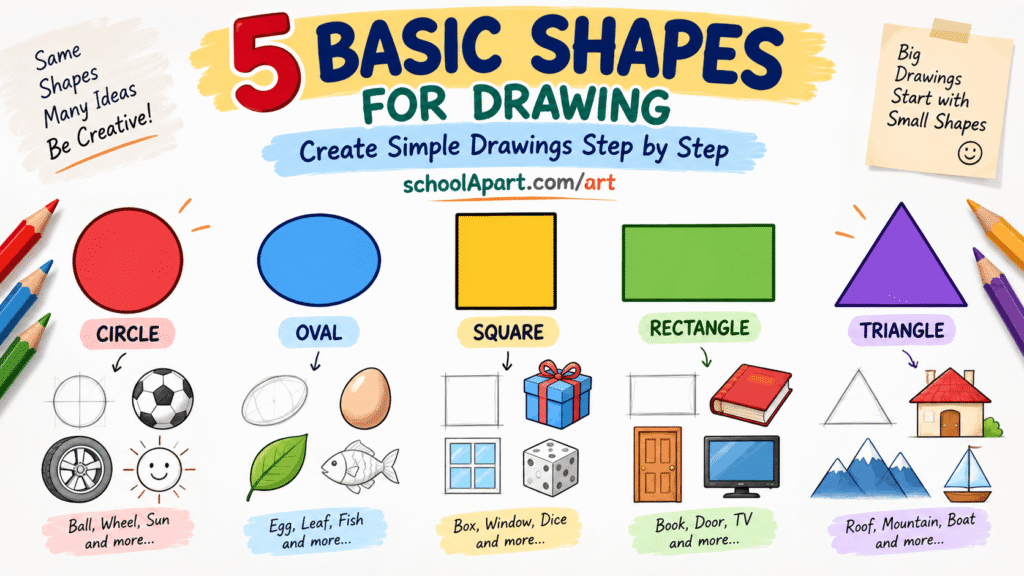
Learning Basic Shapes
Almost every object around us can be simplified into basic shapes.
Learning shapes is one of the most important steps in drawing.
Circle
A circle helps create:
- Faces
- Fruits
- Balls
- Wheels
- Eyes
Practice drawing circles of different sizes.
Square
Squares help create:
- Buildings
- Boxes
- Objects with straight edges
Rectangle
Rectangles are useful for:
- Books
- Doors
- Screens
- Furniture
Triangle
Triangles help create:
- Mountains
- Trees
- Simple structures
3D Shapes
After learning basic 2D shapes, move to three-dimensional forms.
Important 3D shapes include:
Cube
Used for:
- Boxes
- Buildings
- Objects with sharp edges
Cylinder
Used for:
- Bottles
- Cups
- Pipes
Sphere
Used for:
- Balls
- Heads
- Rounded objects
Why Basic Shapes Are Important
Professional artists often begin drawings by creating simple shapes first.
For example:
A human face can start with:
- Circle → Head shape
- Lines → Facial guidelines
- Shapes → Eyes, nose, mouth
A tree can start with:
- Rectangle → Trunk
- Circle shapes → Leaves
Breaking complex objects into simple forms makes drawing easier.
Beginner Exercise: Shape Practice
Try drawing:
- 20 circles
- 20 squares
- 20 triangles
- 10 cubes
- 10 spheres
Don’t worry about perfection.
The goal is to train your hand and improve control.
The Importance of Daily Practice
Drawing improves through repetition.
Even a short daily routine can create noticeable improvement.
A beginner can start with:
- 10 minutes of line practice
- 10 minutes of shape practice
- 10 minutes of simple object drawing
Consistency is more important than long practice sessions once a week.
Developing Observation Skills for Drawing
Many beginners think drawing is mainly about controlling the pencil. However, one of the most important skills behind good drawing is observation.
Artists don’t simply draw what they think an object looks like. They carefully observe what they actually see.
Learning to observe helps you understand:
- Shapes
- Proportions
- Angles
- Light and shadow
- Details
- Textures
How to Improve Observation Skills
Look Before You Draw
Before starting a drawing, spend a few moments studying the object.
Ask yourself:
- What is the basic shape?
- Which parts are bigger or smaller?
- Where are the darkest areas?
- Where does the light come from?
- What details make this object unique?
This simple habit can greatly improve your drawings.
Practice Drawing Simple Objects
Start with everyday objects around you.
Examples:
- Cup
- Book
- Bottle
- Fruits
- Plants
- Shoes
- Toys
Instead of drawing from memory, place the object in front of you and carefully observe it.
Understanding Proportions in Drawing
Proportion means the relationship between the size of different parts of an object.
Correct proportions make drawings look realistic.
For example:
When drawing a face:
- The eyes should have the correct distance from each other.
- The nose should be positioned correctly.
- The mouth should match the size of the face.
Small mistakes in proportion can make a drawing look unnatural.
How to Practise Proportion
Compare Sizes
Before drawing, compare different parts.
Ask:
- Is this part longer or shorter?
- Is this area wider or narrower?
- How many times does one part fit into another?
Use Simple Measurements
Artists often use imaginary measurement lines.
For example:
When drawing a flower:
- Compare the size of petals with the center.
- Check the height compared to the width.
Start With Guidelines
Light guidelines help maintain accuracy.
Examples:
- Face center line
- Horizon line
- Object boundaries
These lines can be erased later.
The Importance of Light and Shadow
Light and shadow make drawings appear three-dimensional.
Without shading, objects often look flat.
Understanding light helps you create:
- Depth
- Realism
- Volume
- Texture
Basic Parts of Light and Shadow
Every object usually has different value areas.
Highlight
The brightest area where light directly hits the object.
Example:
The shiny spot on an apple.
Light Area
The part receiving direct light.
Mid-tone
The middle value between light and dark areas.
Core Shadow
The darkest area on the object itself.
Cast Shadow
The shadow created when an object blocks light.
Example:
A cup creating a shadow on a table.
Understanding Light Direction
Before shading, decide where your light source is coming from.
Examples:
Light From Left
- Left side becomes brighter.
- Right side becomes darker.
Light From Above
- Top areas receive more light.
- Lower areas become darker.
Light From Behind
- Object appears darker with a visible outline.
Knowing the light direction makes shading more realistic.
Basic Shading Techniques for Beginners
Shading creates depth and texture.
Here are some beginner-friendly techniques.
Hatching
Hatching uses parallel lines to create darker areas.
More lines create darker values.
Used for:
- Pencil drawings
- Technical sketches
- Textures
Cross-Hatching
Cross-hatching uses overlapping lines.
It creates stronger shadows compared to regular hatching.
Useful for:
- Portraits
- Objects
- Detailed drawings
Blending
Blending creates smooth transitions between light and dark areas.
Tools:
- Blending stump
- Tissue paper
- Cotton
- Soft cloth
Useful for:
- Realistic drawings
- Portraits
- Smooth surfaces
Stippling
Stippling creates shading using small dots.
More dots create darker areas.
Commonly used in:
- Illustrations
- Ink drawings
- Detailed artwork
Smudging
Smudging spreads graphite to create soft shadows.
Although useful, beginners should avoid excessive smudging because it can reduce drawing clarity.
Practising Shading
Try creating a value scale.
Draw a rectangle and divide it into several sections.
Start with:
- Light gray
- Medium gray
- Dark gray
- Almost black
This teaches you how to control pencil pressure.
Understanding Perspective Drawing
Perspective is the technique artists use to create the illusion of depth on a flat surface.
It helps objects appear three-dimensional.
Without perspective:
- Buildings look flat.
- Objects appear unrealistic.
- Scenes lack depth.
One-Point Perspective
One-point perspective uses a single vanishing point.
Common examples:
- Roads
- Railway tracks
- Hallways
- Straight buildings
All lines move toward one point.
Two-Point Perspective
Two-point perspective uses two vanishing points.
It is useful for drawing:
- Corners of buildings
- Boxes
- Buildings from an angle
Three-Point Perspective
Three-point perspective adds another vanishing point.
It is commonly used for:
- Tall buildings
- Dramatic viewpoints
- City scenes
Beginners should first master one-point perspective.
Simple Perspective Exercise
Practice drawing:
- A horizon line.
- A vanishing point.
- Lines moving toward the point.
- Simple boxes and buildings.
Once you understand boxes, many complex objects become easier to draw.
Beginner Drawing Projects
After learning lines, shapes, shading, and perspective, start practising simple projects.
Project 1: Apple Drawing
Skills learned:
- Circle shape
- Light and shadow
- Texture
- Shading
Steps:
- Draw the basic apple shape.
- Add the stem.
- Identify the light source.
- Add shadow areas.
- Blend gradually.
Project 2: Simple Flower Drawing
Skills learned:
- Curved lines
- Symmetry
- Details
Steps:
- Draw the flower center.
- Add petals.
- Add stem and leaves.
- Add light shading.
Project 3: House Drawing
Skills learned:
- Shapes
- Perspective
- Straight lines
Steps:
- Draw a basic box.
- Add roof shape.
- Add windows and doors.
- Add shading and details.
Project 4: Tree Drawing
Skills learned:
- Organic shapes
- Texture
- Light and shadow
Steps:
- Draw the trunk.
- Add branches.
- Create leaf shapes.
- Add highlights and shadows.
Creating a Daily Drawing Routine
Regular practice is the fastest way to improve.
You don’t need hours every day.
A focused 20–30 minute routine is enough.
30-Minute Beginner Drawing Routine
First 5 Minutes
Warm-up exercises:
- Lines
- Circles
- Curves
Next 10 Minutes
Practice:
- Shapes
- Shading
- Texture
Next 10 Minutes
Draw one simple object.
Examples:
- Cup
- Fruit
- Plant
- Toy
Last 5 Minutes
Review your drawing.
Ask:
- What improved?
- What needs practice?
- What mistake can I fix next time?
Keeping a Drawing Journal
A drawing journal helps track progress.
Include:
- Daily sketches
- Practice exercises
- Ideas
- Notes about improvement
After a few months, comparing old and new drawings can show how much you have improved.
Common Beginner Practice Mistakes
Avoid these habits:
Practising Only Easy Drawings
Challenge yourself gradually.
Drawing Without Observation
Always study real objects.
Focusing Only on Details
First improve:
- Shape
- Proportion
- Structure
Details come later.
Giving Up After Mistakes
Mistakes are part of learning.
Every artist improves through correction and repetition.
7-Day Drawing Practice Plan for Beginners
If you are just starting your drawing journey, following a structured practice plan can help you improve faster.
The goal is not to create perfect artwork immediately. The goal is to build strong fundamentals.
Day 1: Line Control Practice
Practice different types of lines:
- Straight lines
- Curved lines
- Zigzag lines
- Spiral lines
- Parallel lines
Goal:
Improve hand control and pencil movement.
Day 2: Shape Practice
Draw basic shapes:
- Circles
- Squares
- Triangles
- Rectangles
Then convert them into 3D forms:
- Cubes
- Cylinders
- Spheres
Goal:
Learn how simple shapes create complex objects.
Day 3: Shading Practice
Create a value scale from light to dark.
Practice:
- Light pressure
- Medium pressure
- Heavy pressure
Try different shading methods:
- Hatching
- Cross-hatching
- Blending
Goal:
Understand how to create depth.
Day 4: Object Drawing
Choose simple objects around you.
Examples:
- Cup
- Book
- Bottle
- Fruit
- Plant
Focus on:
- Shape
- Proportion
- Shadow
- Details
Day 5: Perspective Practice
Practice drawing:
- Boxes
- Rooms
- Roads
- Buildings
Learn how objects become smaller as they move away.
Day 6: Nature Drawing
Try drawing:
- Trees
- Flowers
- Leaves
- Mountains
- Clouds
Focus on observing real shapes instead of drawing symbols from memory.
Day 7: Create Your First Complete Drawing
Combine everything you learned.
Choose a simple subject and create a complete artwork.
Remember:
- Start with basic shapes.
- Check proportions.
- Add details later.
- Use shading carefully.
30-Day Drawing Challenge for Beginners
A 30-day challenge helps build consistency and confidence.
Week 1: Basic Skills
Day 1
Line practice
Day 2
Circles and basic shapes
Day 3
3D shapes
Day 4
Simple objects
Day 5
Shading exercises
Day 6
Texture practice
Day 7
Free sketch
Week 2: Everyday Objects
Practice drawing:
Day 8
Cup
Day 9
Book
Day 10
Bottle
Day 11
Fruit
Day 12
Flower
Day 13
Plant
Day 14
House
Week 3: Developing Creativity
Practice:
Day 15
Cartoon character
Day 16
Animal drawing
Day 17
Tree landscape
Day 18
Mountain scene
Day 19
Room interior
Day 20
Object composition
Day 21
Creative imagination drawing
Week 4: Improving Technique
Focus on:
Day 22
Advanced shading
Day 23
Perspective scene
Day 24
Portrait basics
Day 25
Hand drawing practice
Day 26
Clothing folds
Day 27
Texture drawing
Day 28
Detailed object drawing
Day 29
Create your own artwork
Day 30
Review your progress
Compare your first drawing with your latest drawing and notice your improvement.
Tips to Improve Drawing Faster
Practice Regularly
Drawing for 20 minutes every day is better than drawing for three hours once a month.
Consistency builds skill.
Draw From Real Life
Reference images and real objects teach you:
- Accurate shapes
- Natural proportions
- Realistic details
Don’t Skip Basic Exercises
Many beginners want to draw complicated portraits immediately.
However, strong artists first master:
- Lines
- Shapes
- Forms
- Shading
- Perspective
Study Other Artists
Observe artwork from experienced artists.
Notice:
- How they use lines.
- How they create shadows.
- How they arrange compositions.
Learn from them, but develop your own style over time.
Keep Your Old Drawings
Never throw away your beginner drawings.
They help you:
- See improvement.
- Understand mistakes.
- Stay motivated.
Be Patient
Drawing improvement takes time.
Some skills may improve quickly, while others require months of practice.
Progress comes from continuous learning.
Digital Tools for Beginners (Optional)
Although traditional drawing is the best place to build fundamentals, digital tools can also support learning.
Beginners can explore:
- Drawing tablets
- Stylus pens
- Digital sketching apps
Digital drawing helps practise:
- Layers
- Colour
- Editing
- Digital painting techniques
However, understanding basic drawing principles remains important.
How Long Does It Take to Learn Drawing?
The time required depends on:
- Practice frequency
- Learning method
- Observation skills
- Type of drawing you want to create
With regular practice:
- Basic control can improve within weeks.
- Simple drawings can become easier within months.
- Advanced skills develop through years of practice.
The most important factor is consistency.
Beginner Drawing Progress Path
A simple learning path:
Stage 1: Foundation
Learn:
- Lines
- Shapes
- Forms
- Pencil control
Stage 2: Basic Drawing
Learn:
- Objects
- Simple scenes
- Shading
- Texture
Stage 3: Intermediate Skills
Learn:
- Perspective
- Portraits
- Anatomy basics
- Composition
Stage 4: Advanced Art
Explore:
- Realistic drawing
- Digital art
- Character design
- Professional illustration
Key Takeaways
- Anyone can learn drawing with practice.
- Drawing is a skill that improves over time.
- Start with basic tools and simple exercises.
- Learn lines and shapes before complex artwork.
- Observation is one of the most important drawing skills.
- Understanding proportion makes drawings more realistic.
- Light and shadow create depth.
- Perspective helps create realistic spaces.
- Daily practice produces better results than occasional practice.
- Mistakes are an important part of the learning process.
Frequently Asked Questions (FAQ)
1. Can anyone learn drawing?
Yes. Drawing is a skill that can be learned through practice, observation, and proper guidance.
2. How should a beginner start drawing?
Beginners should start with basic lines, shapes, shading exercises, and simple objects before moving to complex drawings.
3. What should I draw first as a beginner?
Start with simple objects like:
- Fruits
- Cups
- Books
- Plants
- Basic shapes
These help build confidence.
4. How long does it take to become good at drawing?
It depends on practice and dedication. Regular practice over months and years leads to significant improvement.
5. Is drawing a talent or a skill?
Drawing is mainly a skill. Natural interest can help, but practice plays the biggest role in improvement.
6. What pencil is best for beginner drawing?
HB, 2B, 4B, and 6B pencils are excellent choices for beginners.
7. How many hours should I practise drawing?
Even 20–30 minutes of focused daily practice can create improvement.
8. Should beginners learn shading?
Yes. Shading helps create depth, realism, and three-dimensional effects.
9. Is copying drawings good for learning?
Copying can help beginners understand techniques, but they should also practise drawing from real objects and imagination.
10. What are the basic skills needed for drawing?
Important skills include:
- Observation
- Line control
- Shape understanding
- Proportion
- Shading
- Perspective
11. Why do my drawings look wrong?
Common reasons include:
- Incorrect proportions
- Lack of observation
- Weak understanding of shapes
- Limited practice
These improve with training.
12. Can children learn drawing?
Yes. Drawing helps children develop creativity, concentration, and visual thinking skills.
13. Should I learn drawing before painting?
Learning basic drawing skills can make painting easier because drawing improves observation and composition.
14. Can I learn drawing without an art teacher?
Yes. Books, online resources, practice exercises, and self-learning can help beginners improve.
15. What is the biggest mistake beginners make?
The biggest mistake is expecting perfect results too quickly and avoiding regular practice.
Starting drawing may feel difficult at first, but every artist begins with simple lines, shapes, and basic exercises.
The secret to improvement is not expensive tools or natural talent—it is consistent practice, careful observation, and patience.
Begin with small goals. Practise basic shapes, understand light and shadow, study objects around you, and gradually challenge yourself with more complex drawings.
Every sketch you create teaches you something new.
Whether you want to become an illustrator, painter, digital artist, or simply enjoy drawing as a hobby, building strong fundamentals will help you progress confidently.
Pick up your pencil, open your sketchbook, and start your creative journey today.


Leave a Reply